Select Page
Web Design I
Class 11: Introduction to WordPress

Topics

    • Intro to WordPress
    • Image Driven Design
    • Week 11 CMS Site (creation) Lab

Class 11 is out of this world.

Slide01
PlayPlay
Slide02
PlayPlay
Slide03
PlayPlay
Slide04
PlayPlay
Slide05
PlayPlay
Slide06
PlayPlay
Slide07

Intro to WordPress

Content Management System (CMS):

Content management systems are exactly what the name implies. They are basically a construct that allows the user/s to design and layout their text, images, and other media in a very top-level down and often visual manner. Many hosting services offer their own CMS software (GoDaddy, Squarespace, Wix, etc.).

By far the most common CMS is WordPress (this site is made with it). It makes up roughly 25% of site creations.

WordPress.com vs WordPress.org

This can be a bit confusing.

WordPress.com
  • Offers free hosting
  • You have a sub-domain (ex. wordpress.yourBlog.com)
  • Themes and plug-ins are very limited
  • Typically only really usable for blog
  • Basically it is very simple to setup but not flexible
  • WordPress.com now offers many of the same options as wordpress.org for a fee
WordPress.org
  • You host your own site (usually rent a server>
  • Custom domain name
  • You have the ability to upload any theme or plug-in including custom ones
  • Using various tools a fully dynamic site is possible
  • This option is much more complicated but you have complete control
  • Web designers and developers utilize WordPress.org

Local by Flywheel

WordPress is meant to be installed on a server to deliver dynamic content to the user. This would require you to have an online server and domain (which costs money). There are a variety of tools that will allow you to “fake” a local environment to develop a wordpress site offline until it is ready to dispatch. We will be using Local by Flywheel in this class.

There is another option which is probably even more popular but cumbersome. MAMP (Macintosh, Apache, MySQL, & PHP). These are the technologies necessary to host a site locally but Flywheel does the heavy lifting for you.

Local Folder

You need to specify the folder you wish to install your site onto. When you work at home or at the school you must bring this ENTIRE folder with you each time.

The Dashboard:

This is the area you produce and control your content as an administrator.

Dashboard
This section contains mostly news and update information
Posts
Use this section to create blog posts
Media
The library of files you have uploaded onto your site
Pages
Where pages are created and archived
Comments
Any comments on your blogs or pages are displayed here
Appearance
Deals with the application and adjustment of your themes and menus. You may also edit CSS and PHP here
Plug-ins
Utilized to apply plug-ins that add additional functionality to your site
Users
Manage who is allowed to make changes and what
Tools
A variety of functions that allow you to import and export data as well as other things
Settings
Does what the name suggest, like changing default, time display, etc.
Themes:

The first thing you will want to decide on is the theme of your site. This is the template that the entire site will be built from. It drives the look and functionality. There is a huge library of free and premium options. You will see themes that are built with specific subjects, layouts, and features in mind. It has the largest effect on how your site turns out and is the biggest decision you make.

This site has a list of aesthetically pleasing free responsive themes

Plug-ins:

Plug-ins are similar to tiny adapter programs that can add more features that did not come with your theme. Like themes there are a ton of free and premium ones available.

WordPress comes pre-installed with some plug-ins. Some are useful. Some, not so much.
I suggest using these plug-ins:

Page Builder by Site Origin
Allows you do produce “blocks” of content similar to using the row/column system of Bootstrap
Elementor
A very WYSIWYG (what you see is what you get) layout generator. It’s very flexible but a bit buggy
Duplicate Post
Simply duplicates a post. This is particularly crucial to maintain a consistent “style” between pages

Image Driven Design

Using Images:

So much of a page design can be directed by images. It can help make decisions in text, tone, and especially color.

The image:
  • Collect alike images or edit images to be alike by adjusting brightness, tone, and hue. This way they will “fit” with each other.
  • Select a color or colors from the image itself. When you assign the color to your different elements (like the background or text) they will naturally be in harmony with the image.
  • One trick is to find artwork, designs, or even clothing, and use its colors in your own work.

01 Choose an Image

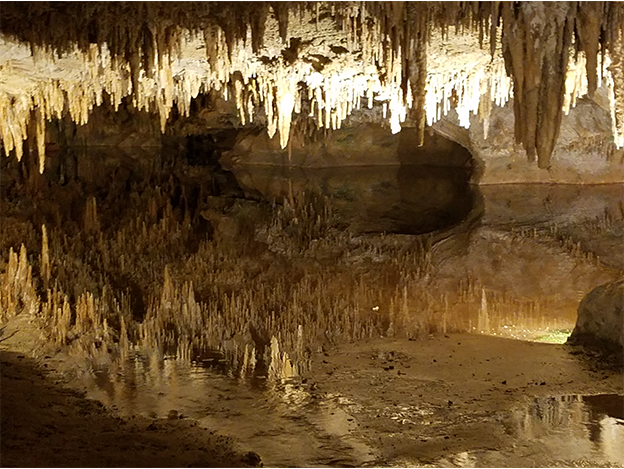
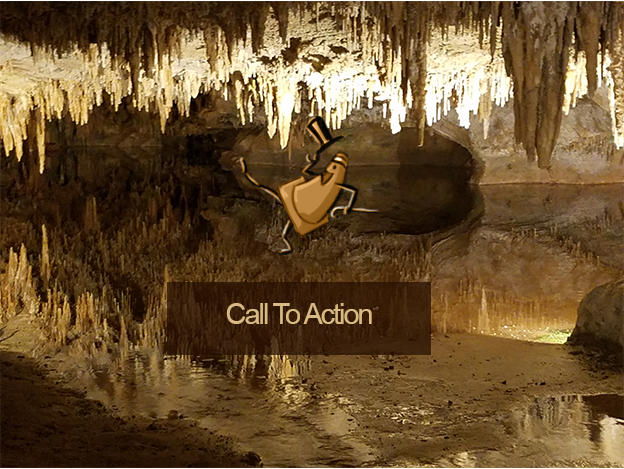
You can use any image that you like the general color scheme of. This is a photo I took of the Luray Caverns when I visited. It has a very monochromatic warm tone to it.

02 Sample the Image

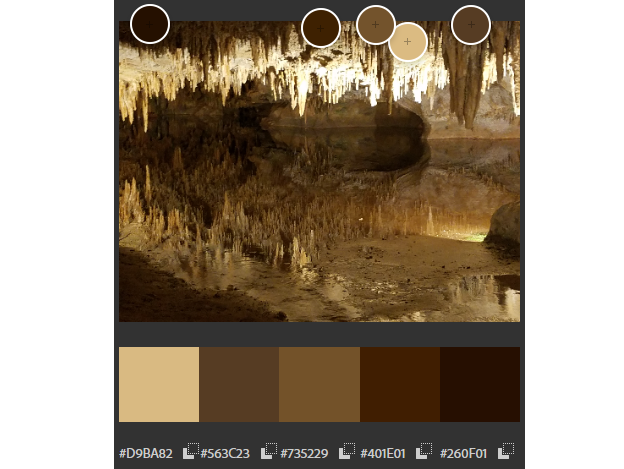
You can manually use the eyedropper to select colors or use a tool like color.adobe.com. You generally want to cut it down between 3-5 colors.

03 Use the Colors

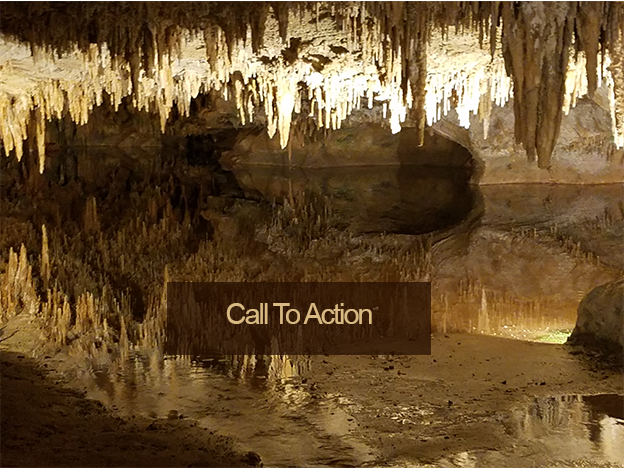
Use the colors sample for the various elements of your design such as background solids or text colors. They will automatically harmonize with the image since the colors exist in the image itself.

04 Matching Images

More often than not your images will not “match.” You can see the cone drawing is clashing.

05 Tint Images

You can tint all images used in a composition to make them match each other or just tint some to match untinted images. Here you can see I tinted the cone drawing to match the background by sampling the brown in the background image.

Week 11 CMS Site (creation) Lab

CMS Site (creation) Lab

The last lab series will cover a Content Management System site creation. In this case we will be using WordPress as our CMS. First you will install Local by Flywheel to install a site locally.Then in WordPress, you will install your theme & plug-ins. It will not be a complete site but will be a foundation to build from.

You will be graded on the following:
  • WordPress:
    • Install Local by Flywheel if necessary.
    • Create a new site using Local by Flywheel.
  • Theme:
    • Locate an unique theme and download & install it.
  • Plug-ins:
    • Locate and install plug-ins that are useful in developing the site.
    • Locate and install plug-ins that add functionality to the site.
  • Aesthetic:
    • Interesting and appealing design.
    • Quality craftsmanship.
Resources:
Assignment Video Tutorials
You may watch the video tutorials below
Assignment Lab Materials
You may download the lab materials here:

Lab Tutorial Slideshow

This tutorial will guide you through the creations of the CMS site

Lab Introduction
CNS Site (creation) Lab
PlayPlay
Introduction

The last lab series will be focused on creating a CMS site. CMS stands for "content management system." Unlike how we created our previous sites this is a very top-down approach with very little coding involved. Instead you install different technologies that handle the programming aspect while you interact with interfaces to add content and format designs. This week we will be getting everything setup.

Click on the > to start

There are no lab materials this week.

Local by Flywheel
Local by Flywheel
CMS Site (creation) Lab
PlayPlay
Local by Flywheel
Instructions
  1. Wordpress is the most popular CMS on the internet but like other CMS's it must be "live" to run. This means it requires various technologies to run. Normally a server would install these technologies as well as Wordpress itself. You would them use Wordpress' interface to create your site.
  2. Unfortunately renting server space cost money. Lucky for us we can generate a development environment on our computers. In our case we will use Local by Flywheel to do this. This program will automatically download, install, and generate the items needed for us to create a Wordpress site. It will not be accessible online but it does let you create a site that you could upload in the future if you desired.
  3. Install Local by Flywheel (link here). This will create the developer environment we need to have a localized Wordpress site.
Site Creation
Site Creation
CMS Site (creation) Lab
PlayPlay
Site Created Example
Instructions
  1. Now that you have Local installed (if you run into issues let me know), you may create your first Wordpress site!
  2. Run Local. In Local press the (Add Site) button.
  3. Choose a name for the site, YourLastNameCMSSite.
  4. Accept the defaults.
  5. Use vcp for the wordpress username and wordpress password. This way I am able to access it for review later.
  6. Click Add Site. Your PC will have a popup asking for permissions. Just allow. It may take a few minutes for Local to create the site. Be patient.
  7. To begin work on the site press the Admin button. It will pop open your default browser. Enter the username and password (vcp).
Wordpress tour
Wordpress Tour
CMS Site (creation) Lab
PlayPlay
Wordpress Admin Dashboard
Instructions
  1. When you log in as Admin you will be brought to the Dashboard (Admin Panel). This is the "back-end" of the site where content is uploaded, pages created, site settings adjusted, and most of the work on the site is completed.
  2. The menu on the left contains the areas controlling the site. Navigate to each and explore what they are.
       Dashboard -This section contains mostly news and update information
       Posts -Use this section to create blog posts
       Media -The library of files you have uploaded onto your site
       Pages -Where pages are created and archived
       Comments -Any comments on your blogs or pages are displayed here
       Appearance -Deals with the application and adjustment of your themes and menus. You may also edit CSS and PHP here
       Plug-ins -Utilized to apply plug-ins that add additional functionality to your site
       Users -Manage who is allowed to make changes and what
       Tools -A variety of functions that allow you to import and export data as well as other things
       Settings -Does what the name suggest, like changing default, time display, etc.
  3. Change the Site Title and Tagline in the Settings>General section.
  4. You may preview your site by clicking on the site name at the top-left of the window.
Theme and Plugins
Theme and Plugins
CMS Site (creation) Lab
PlayPlay
Theme
Plugins
Instructions
  1. A Wordpress theme controls the overall look of the site. You could look at it a lot like the CSS. It may also contain some functional aspects as well. It is the most influential aspect of a Wordpress site. Plugins are specifically used to add functionality to your site. These may be things that the user may see like a carousel, a useful tool like a page builder, or added function like keeping track of viewers.
  2. Wordpress comes preinstalled with a theme and some plugins but they are default and basic. We will search and install a different theme and various plugins.
  3. First install a new theme. Navigate to Appearance>Themes. Here you can see the themes already installed. Click on Add New. There are hundreds (maybe thousands) of themes available. Some cost money and some are free. Normally I would suggest searching on your favorite search engine for a theme. In our case search for Astra. Press Install (visible when you hover over it). Once install is complete press Activate. The theme is now active.
  4. Now let's add some plugins. Navigate to Plugins. Click on Add New. There are a lot of plugins that can add all sorts of functions to a site. We will add a couple to make it easier to build the site. Enter Elementor in the Search plugins... search bar. Click Install Now over top of the plugin when it is revealed. Then press Activate. This plugin allows you to create webpages on the front-end easier.
  5. Complete the same process for Yoast Duplicate Post. This plugin simply allows you to duplicate pages with a click of a button, which is handy.
Page Creation
Page Creation
CMS Site (creation) Lab
PlayPlay
Gutenberg Editor
Instructions
  1. You now have the site setup. Let's create a simple page.
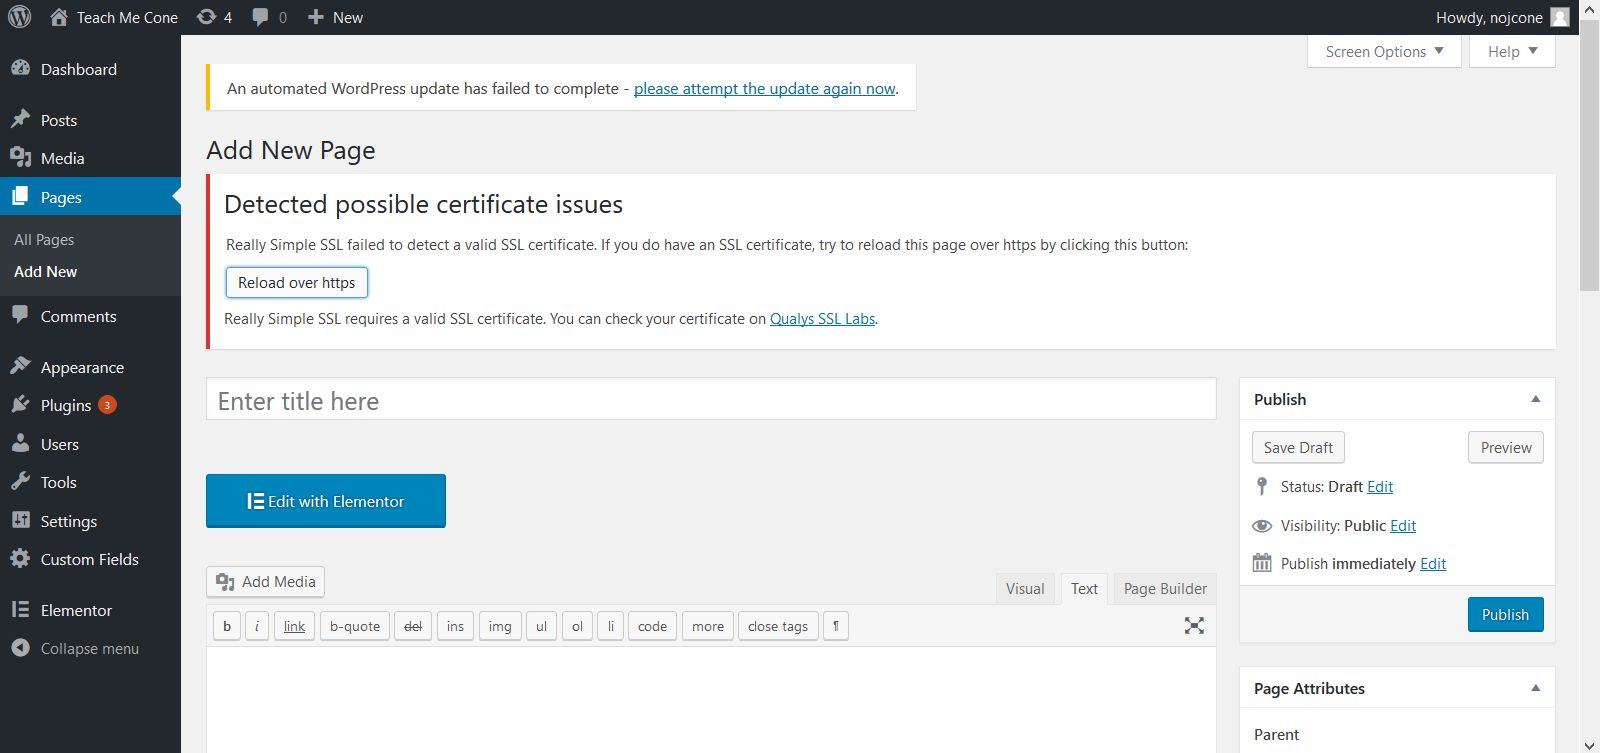
  2. Navigate to Pages. Click on Add New to create a new page. You will automatically be brought to the page creation page.
  3. Under Add title enter the page title My First Page. Press the Publish button at the top-right to save the page.
  4. At the right you will see a panel with two tabs, Page and Block. These are the settings for the page as a whole as well as blocks of content. With the Page tab selected you may change some settings. Change Page Attributes: Template: Elementor Full Width. This will make the content of the page span across the full-width of the window with no sidebar.
  5. The default built-in editor for page creation is Gutenberg. It is a block-based system where you create blocks of content such as text, headings, images, etc.
  6. Add a block by pressing the + button. A small list of options pop up. Select Browse all. Scroll down the list and choose Heading. You will see an empty heading appear. Enter a heading, Here is my first CMS page.
  7. You may use the block settings menu (with the block selected) to make major block adjustments. Make it full width.
  8. You may make other changes by pressing the options button and selecting Show More Settings. A panel will appear on the right with more options.
  9. Press the + button to add another block. This time choose Image. Click on Upload and navigate to an image to upload (whatever you want is fine).
  10. Press the + button to add another block. You may choose Browse all or simply type the block desired in the search bar, in this case we want Columns. Choose the three column option. Use the block settings to make the column row Wide width.
  11. Press the + in each column to insert a block. Add an image block. Use the setting to insert an image (again whatever images you want for now).
  12. Press the + to add a paragraph block under each image in each column. Use lorem ipsum (here) for dummy text.
  13. Feel free to add more blocks. Experiment with them and see what is available. We are going to throw this page away next lab so don't worry about ruining it. Just explore.
  14. When you are done press the Update button to save your page. Press Preview>Preview in new tab to see what your page looks like so far.
  15. You have setup a basic site and page. Next week we will expand on this but it is a good start.
Final Review and Submission
CMS Site (creation) Lab
PlayPlay
Local Export
Instructions
  1. You should explore and add anything you would like in the site. The best way to learn is just to play around with it.
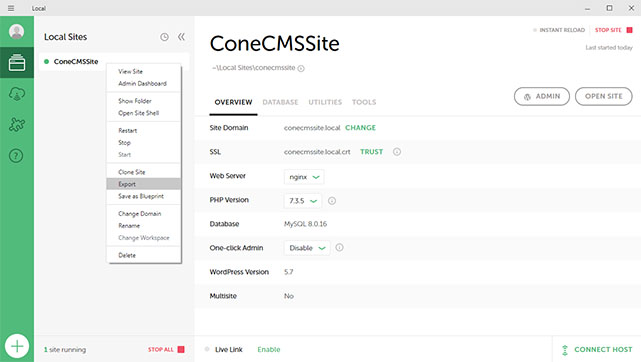
  2. You may view your while working on it but also from the Local interface by pressing the View Site button at the top right of the program. When you are happy with it, it is time to export it out.
  3. In Local right-click on the site name in the list on the left. In the popup choose Export. Don't enter anything in the window. Press Export. In the popup choose where you want to export and export.
  4. Now, log into Blackboard (Here) and click on this course. Inside the course, select Class 11, then the Class 11: CMS Site (creation) Lab folder, then the assignment with the same name. Finally, Attach the zipped file.
Lab Synopsis
Lab Synopsis
PlayPlay
Reflection

This week you were briefly introduced to Wordpress. This powerful CMS is the most popular site creation software on the internet. Next week we will create pages using Elementor that look much more polished.

If you run into any issues please do not hesitate to contact me:

  1. jcone@cecil.edu
  2. (240) 466-1996
 

Wait! Before you go!

Did you remember to?

  • Read through this webpage
  • Watch the videos
  • Submit Week 11 CMS Site (creation) Lab in Assignments section on Blackboard