
Outline:
- Apparel
- Surface Texture
- Facial Features
- Lab Time
- Assignment 02 (sculpt, texture, and output)
Apparel
Class Lecture Part 01
Although you will be drawing on top of the figure you do want to make sure you include these landmarks. These should always be visible where the figure is bare.
Landmarks:
Landmarks are visible protuberances and fossa that hint at the anatomical structure beneath the skin. These should be apparent in all of your work.

You may view slideshows of nude and covered models here
Clothing:
Look at the cloth. You will notice that the cloth will always draw away from the stress, usually caused by gravity. Cloth has no form on its own. It merely reacts to the forces placed upon it (gravity and the model).
Every type of cloth is different so you will really need to pay attention to what you are drawing. If you are going to be “inventing” cloth I suggest getting a piece of similar fabric and observe how it reacts. Different materials wrinkle differently.
Recognize first the form underneath then draw the clothes hanging from it. Do not let the fabric to get overly complicated, find its suggestion.


Utilize Hard and soft lines to create texture within the model. Harder cloth will be more rigid with straighter lines. Softer cloth will be more rounded.
Imagine the difference between modeling a brick and rose. The brick would have hard angular lines while the rose would soft delicate lines.

silk cloth

denim

cotton cloth

leather
Surface Texture
Spotlight:
Perhaps the best way to apply texture to a model is with the Spotlight tool. Basically you load an image and paint through it as though you are using it as a transfer.
To use:
- Press Texture>Import to import an image to use as your texture (for paint, sculpt, or both)
- In the Texture menu press Add To Spotlight (the spotlight tool and image will appear in the viewport)
- There are a number of settings in the radial menu to adjust the position, rotation, scale, etc.
- Press shift + z to turn on/off the spotlight tool. Press z to turn on/off the spotlight tool menu

Facial Features
Class Lecture Part 02
Head:
Head Shapes:
Head shape is rather complicated. It is neither an egg nor a box. It can be simplified into a combination of both.

Low Poly Head Shape:
The skull is still more complicated than the combined sphere and cube. There are a number of peaks that creates its irregular shape.
Connecting them would result in a basic low poly mesh.


Head Box:
Inevitably we want to create all quads so that means our head will end up having similar panels and corners to that of a box.
That box can be broken up to find the placement of the rest of the features of the head.


Facial Planes:
Beyond the irregular shape of the skull the face can be broken down into a series of simple planes.
Every other plane generally runs parallel with each other.
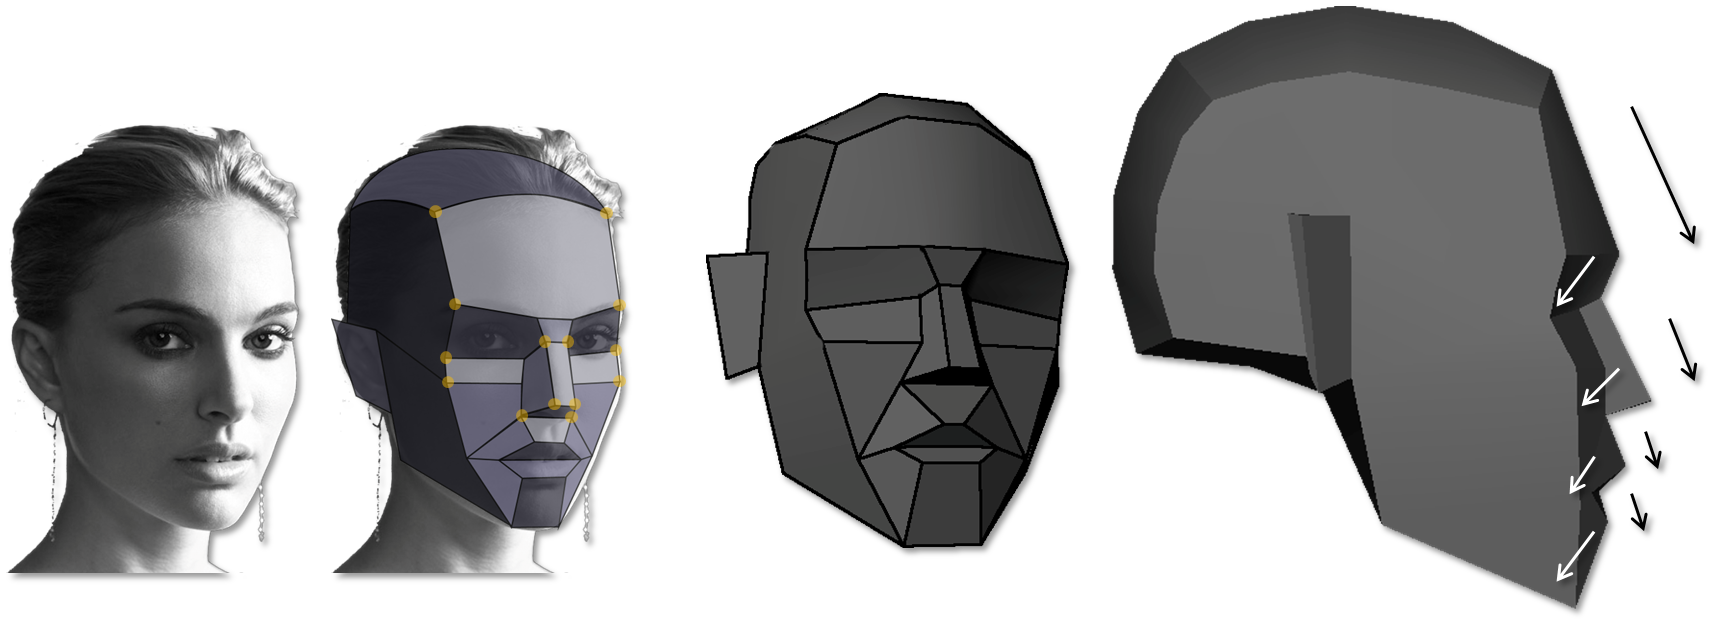
Deformation and Importance:
There are basically three primary edge loops that meet up in the face, two eyes and a mouth.
They are based on both contour and function.
These are also the areas the audience will look at most.

Ear:
The edge loops should mimic the structure of the ear.
Note how the edge loops cross over each other.

Nose:
The nose can be broken into a simple box.
There is a “keystone” that forms that connects the nose the brow area.
This is a great landmark to form edges around.


philtrum (lip dip)
Lips:
The topology of lips you have created on previous characters were probably wrong, even if you matched the reference.
A common mistake to make is to have the lips “pinched at the corners. Instead the lips actually twist inwards at the corners.


Eyes:
The eyes are the “window to the soul” and are the first thing the audience looks to, so it is crucial to get them right.
Generally the eyes do not change much as you get older.
Really observe your eyes and you will notice how asymmetrical they are

Lab Time
Get to work!
Assignment 02
Human Model
The second assignment is to complete a realistic human model. It is suggested that you use yourself as a reference since you are readily available but is not required. The model should be as accurate and believable as possible. The final product should be something that would be suitable for a triple A game.
For Next Class: Complete the sculpt, texture & output
You will be graded on the following:
- Geometry:
- There are no errors in the geometry. Few tris used. Appropriate polycount.
- Topology:
- Gridflow is strong. Topology follows architecture well. Should fully support quality deformation.
- Texturing:
- Well-crafted UV's and elaborate materials are developed. Painted textures are fully developed with a strong sense of color theory. Fully "fleshed" out details are included.
- Creativity & Craftsmanship:
- Well structured, clean model. Novel, unique design.
Resources:
- You can find the rubric under the Assignments content folder in Blackboard.