Custom Theme Site (wordpress setup) Lab
Introduction
This week we will refamiliarize ourselves with Wordpress. The goal is to review the basic interface and to build a simple site to test the labs yet to come.
Click on the > to start
You may downloadthe images used in the lab here:
Knock Off Site images (
Create Local Site
Custom Theme Site (wordpress setup) Lab
Instructions
- Since Web Design I is a requirement for this course you probably already have Local by Flywheel installed. Hopefully you also remember how to create a new local Wordpress site using it. If so you can skip to the next slide. Otherwise...
- Install Local by Flywheel (link here). This will create the developer environment we need to have a localized Wordpress site.
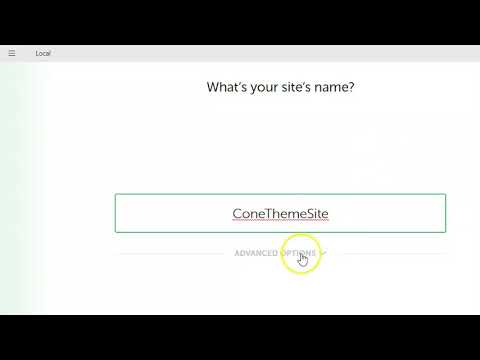
- In Local press the
 (Add Site) button.
 - Choose a name for the site, YourLastNameThemeSite.
- Accept the defaults.
- Use vcp for the wordpress username and wordpress password. This way I am able to access it for review later.
- Click Add Site. Your PC will have a popup asking for permissions. Just allow.
Site Created in Local

Local by Flywheel
Theme and Plugins
Custom Theme Site (wordpress setup) Lab


Simply Gallery Block & Lightbox

Atomic Blocks - Gutenberg Blocks Collection
Instructions
- First thing we will need to do is install the theme, plugins, and adjust some general settings.
- To begin work on the site press the Admin button. It will pop open your default browser. Enter the username and password (vcp).
- The default theme installed is developed by the Wordpress team. You may view it by navigating to Appearance>Themes. It usually is named the current year or previous, such as, twenty twenty. This theme is fine for now since we will be replacing it eventually.
- The next order of business are plugins. Navigate to Plugins>Add New. We will be using the default Gutenberg Wordpress editor to make our pages (simplest to use with our custom theme). Therefore, we will only add a few plugins that work with this block editor.
- Type Simply Gallery Block & Lightbox in the textbox at the top right that says Search plugins.... The plugin should appear in the search results (you can see it's icon below).
- Press the Install Now button. It will be downloaded. Once completed the Activate button will appear. Press it to activate the plugin.
- Complete the same steps to install & activate Atomic Blocks - Gutenberg Blocks Collection.
Homepage
Custom Theme Site (wordpress setup) Lab

Homepage Example

Your homepage may differ. Feel free to change it up.
Instructions
- Besides reviewing Wordpress before diving into making a theme for it we are designing a site to apply a custom made theme to. This is going to require pages to view our design on.
- Navigate to Pages>Add new. This will open up a new page.
- Enter Home for the title (under Enter title).
- We will be using the built-in Gutenberg editor. This is a block system. One way to add a block is to press the + button. A small list of options pop up. Select Browse all. Scroll down the list and choose Call To Action from the Atomic Blocks section. A CTA (call to action) will be placed.
- You may use the
 block settings menu (with the block selected) to make major block adjustments. Make it full width.
 - You may make other changes by pressing the
 options button and selecting Show More Settings. A panel will appear on the right with more options.
 - Click on each of the components of the CTA block, make changes, and apply an image to the background. Feel free to explore
- Press the + button to add another block. You may choose Browse all or simply type the block desired in the search bar, in this case we want Columns. Choose the three column option. Use the block settings to make the column row Wide width.
- Press the + in each column to insert a block. Add an image block. Use the setting to insert an image.
- Press the + to add a paragraph block under each image in each column. Use lorem ipsum (here) for dummy text.
- That should be good enough for now for a homepage. Press Publish in the top right of the window.
- Press the
 to return to the Dashboard.
Subpages
Custom Theme Site (wordpress setup) Lab

Subpage Example

Instructions
- Next we will create some subpages. These will be produced the same way as the homepage.
- Navigate to Pages>Add new. Enter Products for the title (under Enter title). This will be our products page.
- Press the + button, select Browse all. Choose Simply Slider. Make it Wide width.
- There are a lot of options for the slider if you open the the settings options. Insert the images and adjust the settings. Explore the options.
- Press the + button to add more blocks. Explore the options and make it your own.
- That should be good enough for the product page. Press Publish in the top right of the window.
- Press the to return to the Dashboard.
- Create another page. It may be whatever you like. I would suggest contact, about, more products, etc. Try different blocks and be sure to have enough content to apply your theme to.

subpages
You subpages may differ.
Settings and Tidy Up
Custom Theme Site (wordpress setup) Lab
Instructions
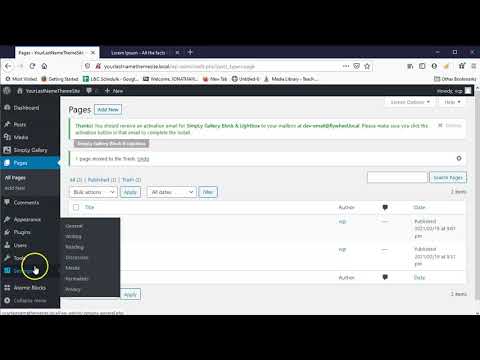
- The final steps will just be some basic cleanup and applying defaults.
- Delete the extra pages. Navigate to Pages. Hover over the pages you wish to delete (Privacy Policy and Sample Page). Select Trash.
- Navigate to Settings>General. Change the Site Title to Knock Off Toys and the Tagline to Awful toys. Truly awful toys.. Press Save Changes.
- Navigate to Reading under the Settings. Under Your homepage display choose A static page. Select your Home page. Press Save Changes.

Final Review and Submission
Custom Theme Site (wordpress setup) Lab
Instructions
- You should explore and add anything you would like in the site. The best way to learn is just to play around with it.
- You may view your while working on it but also from the Local interface by pressing the View Site button at the top right of the program. When you are happy with it, it is time to export it out.
- In Local right-click on the site name in the list on the left. In the popup choose Export. Don't enter anything in the window. Press Export. In the popup choose where you want to export and export.
- Now, log into Blackboard (Here) and click on this course. Inside the course, select Week 06, then the Class 06: Custom Theme Site (wordpress setup) Lab folder, then the assignment with the same name. Finally, Attach the zipped file.

Lab Synopsis
Reflection
We now have a really basic Wordpress site that we can build on. This hopefully was a decent review of the Wordpress interface. Hang on to this site so that we can use it to test our custom theme on in the next lesson.
If you run into any issues please do not hesitate to contact me:
- jcone@cecil.edu
- (240) 466-1996