
Web Design I
Class 02: Introduction to CSSTopics
- HTML Links
- Inline CSS
- CSS Box and Text Properties
- Week 02 Fixed-Width Page (CSS) Lab

You came back for class two!


HTML Links
Directory Structure
When linking a page, an image, or other file you have to tell the browser where it is located.
There are two methods of links:
- Absolute URL
- Directs the browser to the exact location on the web.<a href=”http:www.google.com”>Google</a>
- Relative URL
- Directs the browser to a location in relation to the current document.
-
- same folder
- <img src=”c_image.png” />
- folder below (child)
- <img src=”lowerFolder/d_image.png” />
- folder above(parent)
- <img src=”../b_image.png” />
- two folders below (grandchild)
- <img src=”lowerFolder/lowestFolder/e_image.png” />
- two folders above (grandparent)
- <img src=”../../a_image.png” />

An example of relative URL would be hating your neighbor that lives across the street from you. An example of absolute URL would be hating somebody that lives at a specific address.
Images:
- <img>
- Empty element for images.
- src
- Tells the browser where the image is located.
- alt
- Provides a description of the image if it is not seen.
- title
- Adds additional information to the user if they hover over the image.
- height
- Specifies height.
- width
- Specifies width.
<img src=”images/paco.jpg” alt=”paco hugging a stuffed animal” title=”paco” width=”600″ height=”400″ />
browser view

Links Make it a Site
Links are the defining feature of the web that allows the user to navigate from one page to another, known as web browsing or surfing.
- You can link:
- website to webstite
- page to page
- one area of a page to another area of a page
- open a new window
- open an email program
Links:
- <a>
- (anchor) Creates a link element.
- href
- attribute that specifies the page that is linked.
<a href=”http:www.bing.com”>bing</a>
browser view
Using Images as Links:
Instead of using text inside the opening and closing tags use an image.
<a href=”http:www.bing.com”><img src=”images/bingLogo.png” /></a>
Other Links:
- mailto:
- Opens up the user’s email application and enters the provided email address.
- <a href=”mailto:jon@example.org”>Email Jon</a>
- target:
- Opens up the provided link in a new window.
- <a href=”http://www.imbd.com” target=”_blank”>Internet Movie Database</a>
- #:
- Directs the user to a specified identifier. (two part system)
- <h1 id=”top”>
- <a href=”#top”>Top</a>
browser view
/cdn.vox-cdn.com/assets/3231623/binglogo.jpg)
Embed Pages:
- <iframe>
- Is a window cut into your page that reveals a page underneath
- src
- Used to specify the source URL
- height, width
- Determines the size of the window
<iframe width=”400px” height=”400px” src=”http://www.bing.com”></iframe>
browser view
Video on the Web
HTML5 now natively supports video. Before video would have to be inserted using JavaScript or Flash.
HTML5 Accepts three video formats
- MP4
- WebM
- Ogg
Right now MP4 is the only universally accepted format on all major browsers.
Due to the size of videos it is a much better idea to embed a video from another site such as Youtube than to host it yourself.
Video:
- <video>
- Encapsulates video content.
- src
- Used to specify the video source.
- controls
- Turns the video playback controls on.
- height, width
- Determines the size of the video.
<video width=”320″ height=”240″ controls src=”bioTut.mp4 type=”video/mp4″>Your browser does not support the video</video>
browser view
Audio:
- <audio>
- Encapsulates video content.
- src
- Used to specify the video source.
- controls
- Turns the video playback controls on.
<!– Although HTML5 does support audio I would not use explicitly. It is very annoying to have music or other sounds that you cannot turn off. –>
Inline CSS
CSS (Cascade Style Sheets):
CSS simply allows you to establish rules as to how an HTML or series of HTML elements will display.
CSS is relatively simple but surprisingly tricky.
HTML was originally made to share scientific papers and not as a design medium. CSS fills this gap.
HTML = Text, Content, Structure
CSS = Formatting, Design

HTML vs CSS
HTML is content. CSS adds design.
Box Model:
CSS imposes an imaginary box around each element.
Box Model:
CSS Box Model Example
Here is a paragraph element that is not all that special
Here another paragraph with an emphasis and a strong element in it.
This whole thing is wrapped in a div
CSS Appplication:
CSS can be applied in three ways:
- External CSS Document
- Internal Embedded Code
- Inline Code
<!–external CSS document example–>
<link href=”css/styles.css” type=”text/css” rel=”stylesheet” />
<!–internal embedded CSS example–>
<style type=”text/css”>
body {
font-family: arial;
background-color: rgb(185.179.175);}
h1 {
color: rgb(255.255.255);}
</style>
<!–inline CSS example–>
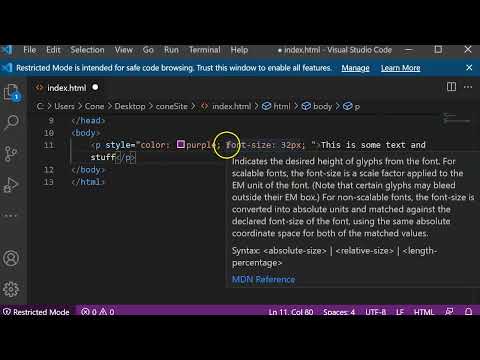
<h1 style=“color: purple”>This is an inline CSS style</h1>
(although in the future this will be the least suggested method)
Inline CSS:
This is used to add specific CSS style to an element.
This is a good way to guarantee the element turns out the way you desire.
Can be the hardest to debug.
This should be used sparingly.
<h1 style=“color: purple”>This is an inline CSS style</h1>
- <style>
- Used to apply the style to a specific element
<h1 style=“color: purple” >This is an inline CSS style</h1>
CSS Box and Text Properties
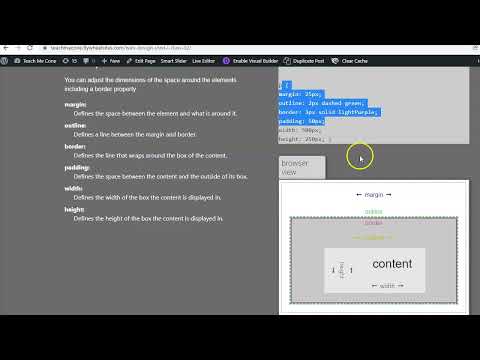
Box Properties:
You can adjust the dimensions of the space around the elements including a border property.
- margin:
- Defines the space between the element and what is around it.
- outline:
- Defines a line between the margin and border.
- border:
- Defines the line that wraps around the box of the content.
- padding:
- Defines the space between the content and the outside of its box.
- width:
- Defines the width of the box the content is displayed in.
- height:
- Defines the height of the box the content is displayed in.
p {
margin: 25px;
outline: 2px dashed green;
border: 3px solid lightPurple;
padding: 50px;
width: 500px;
height: 250px; }
browser view
margin
outline
border
padding
|
height
|
content |
| width |
Box Dimensions:
- width, height
- By default boxes are just big enough to contain the element. This properties allow you to to manually adjust it by pixels, %, EMs.
- min-width, max-width, min-height, max-height
- These properties control the minimum and maximum allowed width and height.
- overflow
- A value of hidden tells the browser to hide anything that does not fit in the box. A scroll value adds a scroll bar so the user can scroll to see the missing content.
<div style=”width:100px; height:50px; background-color:orange;”>
<p>Example</p>
</div>
<div style=”width:50px; height:100px; background-color:orange;”>
<p>Example</p>
</div>
browser view
Example
Example
Padding and Margin:
- padding
- Adds whitespace to the inside of the box. May be defined in px, %, or em.
You can specify each side as padding-top, padding-right, padding-bottom, padding-left, for example: padding: 10px 5px 3px 1px - margin
- Adds whitespace to the outside of the box. May be defined in px, %, or em.
You can specify each side as margin-top, margin-right, margin-bottom, margin-left, for example:margin: 1px 2px 3px 4px
<p style=”margin:5px; border-style:solid; border-width:medium;”>Example</p>
<p style=”margin:25px; border-style:solid; border-width:medium;”>Example</p>
<p style=”padding:5px; border-style:solid; border-width:medium;”>Example</p>
<p style=”padding:25px; border-style:solid; border-width:medium;”>Example</p>
browser view
Example
Example
Example
Example
Border Style:
- border-style
- Used to determine the look of the border.
- solid, dotted, dashed, double, groove, ridge, inset, outset, hidden, none
- border-top-style, border-left-style, border-right-style, border-bottom-style
- You may specify the style of each side of the border.
- border-color
- Describes color of the border.
- rgb, hex codes, CSS color names
-
- Clockwise from top:
- border-color: red green yellow blue;
- border-top-color, border-right-color, border-bottom-color, border-left-color
- You may specify the color of each side of the border.
<p style=”border-style:solid; border-width:medium;”>Example</p>
<p style=”border-style:dashed; border-width:medium;”>Example</p>
<p style=”border-top-style:dashed; border-right-style:double; border-bottom-style:groove; border-left-style:ridge; border-width:medium;”>Example</p>
<p style=”border-color:orange; border-style:inset; border-width:medium;”>Example</p>
<p style=”border-top-color:red; border-right-color:yellow; border-bottom-color:green; border-left-color:blue; border-style:outset; border-width:medium;”>Example</p>
browser view
Example
Example
Example
Example
Example
Border Width:
- border-width
- Determines the width of the border around the element. May be defined in pixels or as “thin, medium, thick”.
- border-top-width, border-right-width, border-bottom-width, border-left-width
- You may specify each side of a border’s thickness.
<div style=”width:100px; height:50px; border-width:10px; border-style:solid;”>
<p>Example</p>
</div>
<div style=”width:100px; height:50px; border-top-width:0px; border-right-width:3px; border-bottom-width:6px; border-left-width:9px; border-style:solid”>
<p>Example</p>
</div>
browser view
Example
Example
Border Shorthand:
It is possible to write all of the border properties on a single line instead of adding individual properties for each. You write it out as width, style, color.
<div style=”width:100px; height:50px; border:3px dotted #0088dd;”>
<p>Example</p>
</div>
browser view
Example
Outline:
- outline
- Used as a shorthand to declare all outline properties at once.
- solid, dotted, dashed, double, groove, ridge, inset, outset, hidden, none
- outline-width
- Describes the thickness of the outline.
- thin, medium, thick, px
- outline-color
- Describes color of the border.
- rgb, hex codes, CSS color names
- outline-style
- You may specify the style of the outline.
- solid, dotted, dashed, double, groove, ridge, inset, outset, hidden, none
<p style=”outline: green dashed thick;”>Example</p>
browser view
Example
Text is Content
This would be considered content that would be placed inside the box model.
Text and Background Color:
- color
- Property that allows you to specify the color of text inside an element
- background-color
- Property that allows you to specify the color of text inside an element
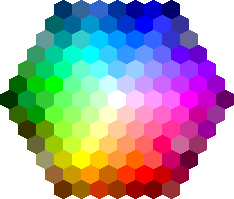
Defining Color:
- RGB Values
- Expresses colors in red, green, & blue
color: rgb(100, 100, 100); - Hex Codes
- Six-digit codes that represent red, green, & blue
color: #ee3e80; - Color Names
- 147 predefined color names recognized by browsers
color: red; - HSL & HSLA
- Uses hue (360), saturation (75%), lightness (50%), & alpha (0.25)
Color: hsla (0, 100%, 50%, 0.5);
<p style=”color:red;”>Example</p>
<p style=”background-color:rgb(51, 204, 51);”>Example</p>
browser view
Example
Example
Font and Font Size:
- font-family
- Specifies what font you would like to apply to the element. You can add multiple values to the same property in case the user does not have your fist choice installed.
font-family: George, Times, serif; - font-size
- Specifies the size of the font. Can be specified by pixels, percentages, & EMS. EMS is the width of a letter m.
font-size: 12px;
font-size: 200%;
font-size: 1.3em;
<p style=”font-family: Times New Roman, Times, serif; font-size:36px;”>Example</p>
browser view
Example
Text Alignment:
- text-align
- Aligns a text element on the horizontal
- left, right, center, justify
- vertical-align
- Aligns a text element on the vertical
- baseline, sub, super, top, text-top, middle, bottom, text-bottom
- text-indent
- Indents the first line of text. Value is written in pixels or ems.
<div style=”text-align:left; vertical-align:bottom;”>
<p style=” text-indent:2em;”>Example Example</p>
<p>Example Example</p>
</div>
<div style=”text-align:right; vertical-align:top; text-indent:2em;”>
<p>Example Example</p>
<p>Example Example</p>
</div>
browser view
Example Example
Example Example
Example Example
Example Example
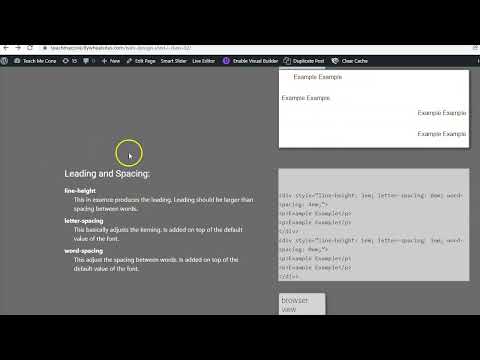
Leading and Spacing:
- line-height
- This in essence produces the leading. Leading should be larger than spacing between words.
- letter-spacing
- This basically adjusts the kerning. Is added on top of the default value of the font.
- word-spacing
- This adjust the spacing between words. Is added on top of the default value of the font.
<div style=”line-height: 3em; letter-spacing: 0em; word-spacing: 4em;”>
<p>Example Example</p>
<p>Example Example</p>
</div>
<div style=”line-height: 1em; letter-spacing: 1em; word-spacing: 0em;”>
<p>Example Example</p>
<p>Example Example</p>
</div>
browser view
Example Example Example
Example Example Example
Example Example
Example Example
Font Style (bold, italic, uppercase, lowercase, underline, strike):
- font-weight
- normal, bold
Normal is a sort of “off switch” - font-style
- normal, italic, oblique
Oblique = slant. Italic = calligraphy - text-transform
- uppercase, lowercase, capitalize
Capitalize only capitalizes first letter of each word - text-decoration
- none, underline, overline, line-through, blink
None is useful to remove underline from links. Blink makes the text blink
<p style=”font-weight: bold;“>Example</p>
<p style=”font-style: italic;“>Example</p>
<p style=”text-transform: uppercase;“>Example</p>
<p style=”text-decoration: underline;“>Example</p>
browser view
Example
Example
Example
Example
Week 02 Fixed-Width Page (CSS) Lab
Week 02 Fixed-Width Page (CSS) Lab:
Now that we have created a HTML document we can further develop it and apply basic CSS rules. This is where you get to actually apply some real design elements. You will attach at least an image and create a hyperlink. You will also apply CSS rules to control text, images, and boxes. When completed zip the entire site folder and submit it on Blackboard.
You will be graded on the following:
- Basic Document & File Structure:
- Master folder created with correct sub folders.
- All files named and placed correctly.
- Basic HTML and CSS structure produced.
- HTML:
- Image/s attached correctly.
- Link/s produced functionally.
- Updated content.
- CSS:
- Add rules to control the text.
- Add rules to control the image/s.
- Add rules to control the boxes.
- Aesthetics:
- Interesting and appealing design.
- Page that has some aesthetics incorporated.
Resources:
- Assignment Video Tutorials
- You may watch these tutorial videos below to help you complete your assignment.
- Assignment Lab Materials
- You may download the base site used in lab here:
siteForFixedWidthCSSPageLab
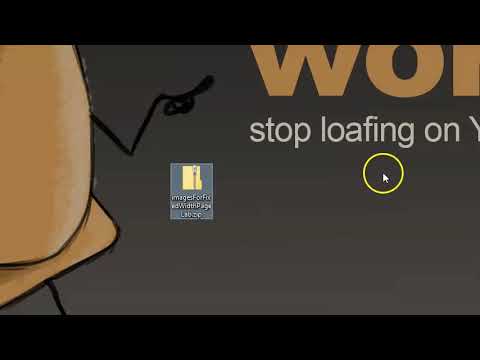
You may download the images used in lab here:
imagesForFixedWidthPageLab
Lab Tutorial Slideshow
This tutorial will guide you through basic HTML document construction for the completion of the lab assignment.
This lab builds on the last. The HTML we have written has provided the textual content and basic formatting. The page is pretty boring. We will use HTML to create links to other pages and images. CSS will also be applied to add additional design components and formatting.
So let's get to it...
You may use what you created in the last lab or if you would like you may use this:
Fixed-Width Page (css) Lab Materials (
<!DOCTYPE html>
<html>
<head>
    <title>Biography of Cone</title>
    <meta charset="UTF-8" />
    <meta name="description" content="a narrative about cone" />
</head>
<body>
    <h1>Cone</h1>
    <p>personal site: <a href="https://teachmecone.com">teachmecone.com</a></p>
    <p>The man, the myth, the <strong>primitive shape</strong>.</p>
    <hr />
    <h2>In the beginning...</h2>
    <p>He was born in upstate NY. Have you been there? No you haven't because you have no reason too. It's drab.</p>
    <br />
    <h2>Presently coding this document</h2>
    <p>Write now he is teaching this class and writing this code. Inspirational.</p>
    <br />
    <h2>His Future</h2>
    <p>He wantes to make the best <em>courses ever</em>, create more <em>short films</em>, and be <em>more fit</em>.</p>
    <h4>He has <strong>none</strong>.</h4>
    <br />
    <h3>Things he dislikes</h3>
    <ul>
        <li>Cats</li>
        <li>Vehicles that go Vroom</li>
        <li>Bug Meat</li>
    </ul>
    <p><a href="https://teachmecone.com">teachmecone.com</a></p>
</body>
</html>
- The defining feature of webpages is the web part. Although we are making a single webpage let's place a couple of links to a site.
- Enter a new line under <h1>Cone</h1>. Type <p>personal site: <a href=
"https://teachmecone.com">
teachmecone.com</a></p> - At the end of the page enter a new line under
<ul>
<li>Cats</li>
<li>Vehicles that go Vroom</li>
<li>Bug Meat</li>
</ul>
and enter <p>personal site: <a href=
"https://teachmecone.com">
teachmecone.com</a></p> - The anchor element (<a>) is responsible for linking webpages. The added href attribute directs the browser to the value entered (="https://teachmecone.com" in this case). The text in between the <a> and </a> is the clickable text visible to the user (teachmecone.com in this case)
Hyper-Link. You get it? (I know, awful)
- The site needs some imagery. Images draw in viewers in. Some sites are almost entire imagery.
- First you must create a folder named images inside your root folder (yourLastName_site).
- Download the images, here (
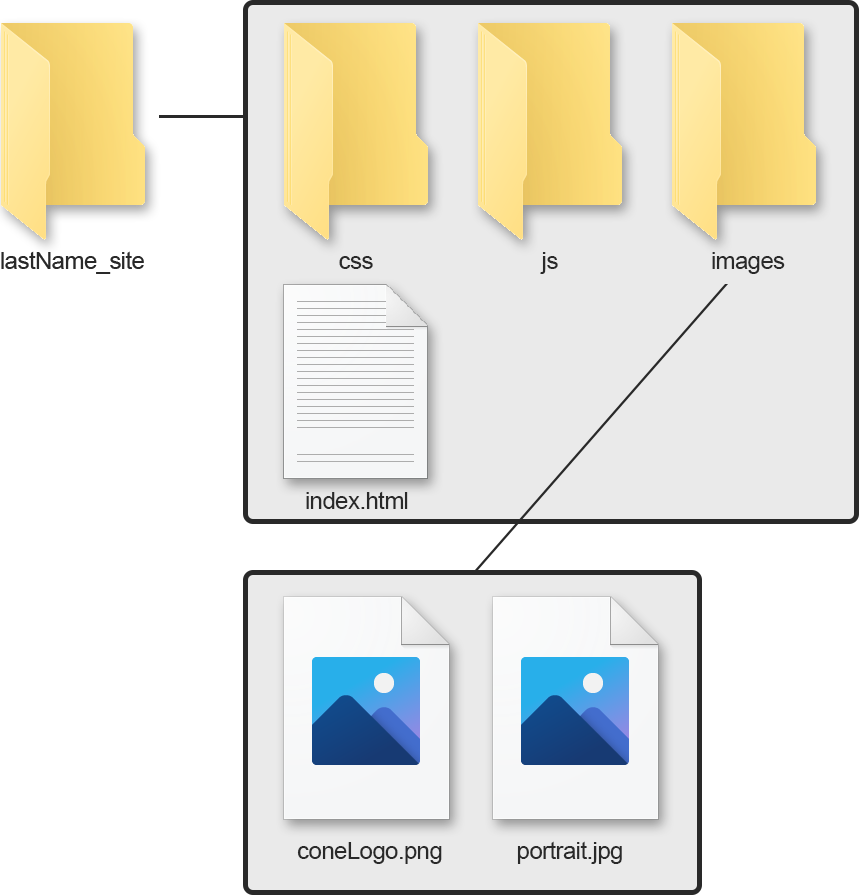
Your file/folder structure should appear as above. There should be a root folder named lastName_site. Inside that folder should contain three folders, css, js, & images, and a file named index.html. The images folder should contain the images (in this case coneLogo.png and portrait.jpg)
It's best to use your own images. Everything you make on the internet is instantly public so you have to have copyrights
<!DOCTYPE html>
<html>
<head>
    <title>Biography of Cone</title>
    <meta charset="UTF-8" />
    <meta name="description" content="a narrative about cone" />
</head>
<body>
    <h1>Cone</h1>
    <img src="images/portrait.JPG" alt="portrait of cone" />
    <p>personal site: <a href="https://teachmecone.com">teachmecone.com</a></p>
    <p>The man, the myth, the <strong>primitive shape</strong>.</p>
    <hr />
    <h2>In the beginning...</h2>
    <p>He was born in upstate NY. Have you been there? No you haven't because you have no reason too. It's drab.</p>
    <br />
    <h2>Presently coding this document</h2>
    <p>Write now he is teaching this class and writing this code. Inspirational.</p>
    <br />
    <h2>His Future</h2>
    <p>He wantes to make the best <em>courses ever</em>, create more <em>short films</em>, and be <em>more fit</em>.</p>
    <h4>He has <strong>none</strong>.</h4>
    <br />
    <h3>Things he dislikes</h3>
    <ul>
        <li>Cats</li>
        <li>Vehicles that go Vroom</li>
        <li>Bug Meat</li>
    </ul>
    <p><a href="https://teachmecone.com"><img src="images/coneLogo.png" alt="teachmecone.com"></a></p>
</body>
</html>
- The next step is to actually create the HTML to link the images in the page. The images will appear where they are linked.
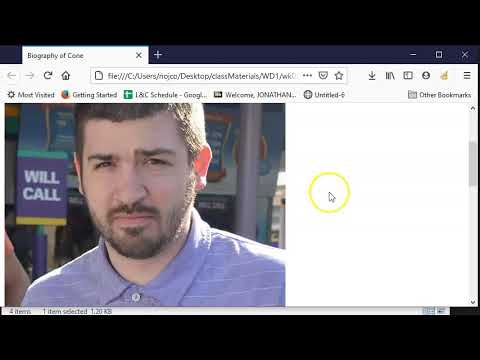
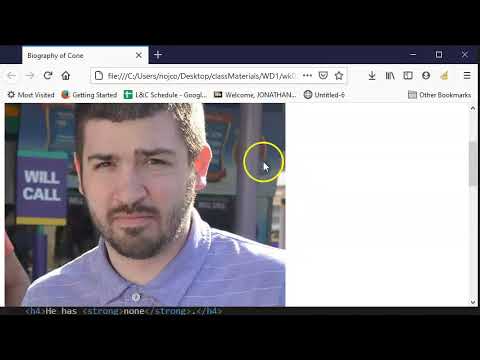
- Type <img src="images/portrait.JPG" alt="portrait of cone" /> on a new line under where <h1>Cone</h1> is written. Beware that you must write the path and file name exactly correct. The alt attribute serves two purposes. This is what will be visible if for some reason the image is not loaded but more importantly this is what will be read if a screen reader is employed.
- Let's use an image as a link instead of text. To do this you must replace the text inside the <a> element of <p><a href="https://teachmecone
.flywheelsites.com"> teachmecone.com</a></p> with <img src="images/coneLogo.png" alt="teachmecone.com"> The result is:
<p><a href="https://teachmecone
.flywheelsites.com"><img src="images/coneLogo.png" alt="teachmecone.com"></a></p> - You now have images embedded in your page
Lincoln image (oh god, another terrible pun).
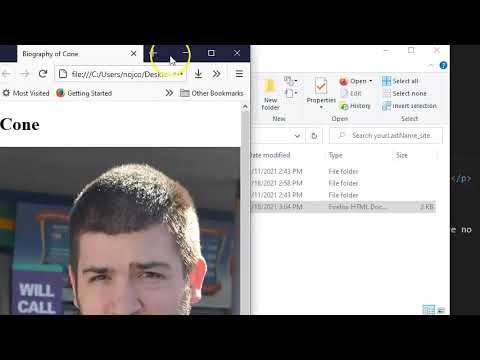
- You have written enough now to preview your work in the browser.
- First save your file (File > Save)
- Navigate to your file on your Desktop. It should appear as a web document. Double-click it to open
<!DOCTYPE html>
<html>
<head>
    <title>Biography of Cone</title>
    <meta charset="UTF-8" />
    <meta name="description" content="a narrative about cone" />
</head>
<body>
    <h1>Cone</h1>
    <img src="images/portrait.JPG" alt="portrait of cone" />
    <p>personal site: <a href="https://teachmecone.com">teachmecone.com</a></p>
    <p>The man, the myth, the <strong>primitive shape</strong>.</p>
    <hr />
    <h2>In the beginning...</h2>
    <p>He was born in upstate NY. Have you been there? No you haven't because you have no reason too. It's drab.</p>
    <br />
    <h2>Presently coding this document</h2>
    <p>Write now he is teaching this class and writing this code. Inspirational.</p>
    <br />
    <h2>His Future</h2>
    <p>He wantes to make the best <em>courses ever</em>, create more <em>short films</em>, and be <em>more fit</em>.</p>
    <h4>He has <strong>none</strong>.</h4>
    <br />
    <h3>Things he dislikes</h3>
    <ul>
        <li>Cats</li>
        <li>Vehicles that go Vroom</li>
        <li>Bug Meat</li>
    </ul>
    <p><a href="https://teachmecone.com"><img src="images/coneLogo.png" alt="teachmecone.com"></a></p>
</body>
</html>
Cone's Biography
Cone

personal site: teachmecone.com
The man, the myth, the primitive shape.
In the beginning...
He was born in upstate NY. Have you been there? No you haven't because you have no reason too. It's drab.
Presently coding this document
Write now he is teaching this class and writing this code. Inspirational.
His Future
He wantes to make the best courses ever, create more short films, and be more fit.
He has none.
Things he dislikes
Cats
Vehicles that go Vroom
Bug Meat

<!DOCTYPE html>
<html>
<head>
    <title>Biography of Cone</title>
    <meta charset="UTF-8" />
    <meta name="description" content="a narrative about cone" />
</head>
<body style="background-color: #cab5d7; width: 960px; margin: 10px; padding: 0px; font-family: 'Franklin Gothic Medium', 'Arial Narrow', Arial, sans-serif; color: #292929; font-size: 18px;">
    <h1>Cone</h1>
    <img src="images/portrait.JPG" alt="portrait of cone" />
    <p>personal site: <a href="https://teachmecone.com">teachmecone.com</a></p>
    <p>The man, the myth, the <strong>primitive shape</strong>.</p>
    <hr />
    <h2>In the beginning...</h2>
    <p>He was born in upstate NY. Have you been there? No you haven't because you have no reason too. It's drab.</p>
    <br />
    <h2>Presently coding this document</h2>
    <p>Write now he is teaching this class and writing this code. Inspirational.</p>
    <br />
    <h2>His Future</h2>
    <p>He wantes to make the best <em>courses ever</em>, create more <em>short films</em>, and be <em>more fit</em>.</p>
    <h4>He has <strong>none</strong>.</h4>
    <br />
    <h3>Things he dislikes</h3>
    <ul>
        <li>Cats</li>
        <li>Vehicles that go Vroom</li>
        <li>Bug Meat</li>
    </ul>
    <p><a href="https://teachmecone.com"><img src="images/coneLogo.png" alt="teachmecone.com"></a></p>
</body>
</html>
- All the major HTML content is now written. It is time to write some CSS (cascade style sheets). This will allow us to add some design to the page. First we will apply some inline CSS to the opening <body> tag. This will cascade down to all elements nested inside it.
- Replace <body> with:
<body style="background-color: #cab5d7; width: 960px; margin: 10px; padding: 0px; font-family: 'Franklin Gothic Medium', 'Arial Narrow', Arial, sans-serif; color: #292929; font-size: 18px;"> - Now the entire page is formatted with purplish color, margin space, removed padding, an Arial font or at least San Serif, and almost black text at 18 pixels tall.


<!DOCTYPE html>
<html>
<head>
    <title>Biography of Cone</title>
    <meta charset="UTF-8" />
    <meta name="description" content="a narrative about cone" />
</head>
<body style="background-color: #cab5d7; width: 960px; margin: 10px; padding: 0px; font-family: 'Franklin Gothic Medium', 'Arial Narrow', Arial, sans-serif; color: #292929; font-size: 18px;">
    <h1 style="font-size: 48px; text-align: center; color: rgb(78, 78, 78)">Cone</h1>
    <img style="width:300px" src="images/portrait.JPG" alt="portrait of cone" />
    <p style="text-align: center;">personal site: <a href="https://teachmecone.com">teachmecone.com</a></p>
    <p style="text-align: center;">The man, the myth, the <strong>primitive shape</strong>.</p>
    <hr style="margin-bottom: 50px;" />
    <h2 style="color: rgb(78, 78, 78)">In the beginning...</h2>
    <p style="background-color: hsl(56, 80%, 90%); padding:20px;">He was born in upstate NY. Have you been there? No you haven't because you have no reason too. It's drab.</p>
    <br />
    <h2 style="color: rgb(78, 78, 78)">Presently coding this document</h2>
    <p style="background-color: hsl(56, 80%, 90%); padding:20px;">Write now he is teaching this class and writing this code. Inspirational.</p>
    <br />
    <h2 style="color: rgb(78, 78, 78)">His Future</h2>
    <p style="background-color: hsl(56, 80%, 90%); padding:20px;">He wants to make the best <em>courses ever</em>, create more <em>short films</em>, and be <em>more fit</em>.</p>
    <h4>He has <strong>none</strong>.</h4>
    <br />
    <h3 style="color: rgb(78, 78, 78);">Things he dislikes</h3>
    <ul style="border-style: solid; border-width: 2px; border-color: hsl(56, 80%, 90%);">
        <li>Cats</li>
        <li>Vehicles that go Vroom</li>
        <li>Bug Meat</li>
    </ul>
    <p><a href="https://teachmecone.com"><img src="images/coneLogo.png" alt="teachmecone.com"></a></p>
</body>
</html>
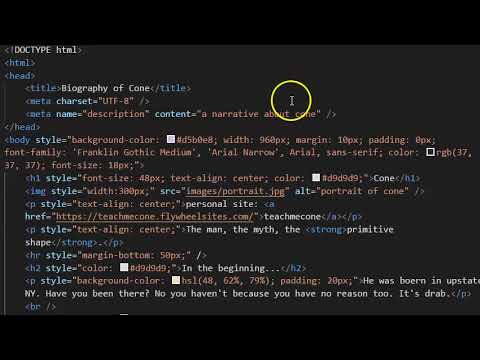
- Now we will apply CSS to elements on the page to include sizing, coloring, and other formatting. Like the previous slide, inline CSS is applied by adding style=" then your CSS rules finished with " inside the opening tag of an element
- Add style="font-size: 48px; text-align: center; color: rgb(78, 78, 78)" to the <h1> tag
- Add style="width:300px" to the <img> tag
- Add style="text-align: center;" to the next two <p> tags
- Add style="margin-bottom: 50px" to the <hr /> tag
- Add style="color: rgb(78, 78, 78)" to the <h2> and <h3> tags
- Add style="background-color: hsl(56, 80%, 90%); padding:20px;" to the remaining <p> tags
- Add style="border-style: solid; border-width: 2px; border-color: hsl(56, 80%, 90%);" to the <ul> tag

- Before you submit you should review your code and Save your file (File > Save), navigate to your file on your Desktop, and double-click it to open
- Look for any errors. If there are any, look through your code and fix them. When you are happy, proceed
- Your site is not just the single HTML document you have created but the root folder and all contents therein. You MUST submit the ENTIRE folder
- You cannot submit folders on Blackboard. Instead we can zip the folder and submit that. Navigate to the location of your site folder. Right-click over top of it and select Send to > Compressed (zipped) folder on Windows and Compress on MacOS. A new zipped file will be created
- Lastly, log into Blackboard (Here) and click on this course. Inside the course, select Week 02, then the Week 02: Fixed-Width Page (CSS) Lab folder, then the assignment with the same name. Finally, Attach the zipped file.
<!DOCTYPE html>
<html>
<head>
    <title>Biography of Cone</title>
    <meta charset="UTF-8" />
    <meta name="description" content="a narrative about cone" />
</head>
<body style="background-color: #cab5d7; width: 960px; margin: 10px; padding: 0px; font-family: 'Franklin Gothic Medium', 'Arial Narrow', Arial, sans-serif; color: #292929; font-size: 18px;">
    <h1 style="font-size: 48px; text-align: center; color: rgb(78, 78, 78)">Cone</h1>
    <img style="width:300px" src="images/portrait.JPG" alt="portrait of cone" />
    <p style="text-align: center;">personal site: <a href="https://teachmecone.com">teachmecone.com</a></p>
    <p style="text-align: center;">The man, the myth, the <strong>primitive shape</strong>.</p>
    <hr style="margin-bottom: 50px;" />
    <h2 style="color: rgb(78, 78, 78)">In the beginning...</h2>
    <p style="background-color: hsl(56, 80%, 90%); padding:20px;">He was born in upstate NY. Have you been there? No you haven't because you have no reason too. It's drab.</p>
    <br />
    <h2 style="color: rgb(78, 78, 78)">Presently coding this document</h2>
    <p style="background-color: hsl(56, 80%, 90%); padding:20px;">Write now he is teaching this class and writing this code. Inspirational.</p>
    <br />
    <h2 style="color: rgb(78, 78, 78)">His Future</h2>
    <p style="background-color: hsl(56, 80%, 90%); padding:20px;">He wantes to make the best <em>courses ever</em>, create more <em>short films</em>, and be <em>more fit</em>.</p>
    <h4>He has <strong>none</strong>.</h4>
    <br />
    <h3 style="color: rgb(78, 78, 78);">Things he dislikes</h3>
    <ul style="border-style: solid; border-width: 2px; border-color: hsl(56, 80%, 90%);">
        <li>Cats</li>
        <li>Vehicles that go Vroom</li>
        <li>Bug Meat</li>
    </ul>
    <p><a href="https://teachmecone.com"><img src="images/coneLogo.png" alt="teachmecone.com"></a></p>
</body>
</html>
Cone's Biography
Cone
personal site: teachmecone.com
The man, the myth, the primitive shape.
In the beginning...
He was born in upstate NY. Have you been there? No you haven't because you have no reason too. It's drab.
Presently coding this document
Write now he is teaching this class and writing this code. Inspirational.
His Future
He wantes to make the best courses ever, create more short films, and be more fit.
He has none.
Things he dislikes
Cats
Vehicles that go Vroom
Bug Meat

Now your site doesn't look like it came from the 90's. It looks like it came from the 2000's. It's at least marginally better.
We covered how to apply basic CSS but much more could be done. There are an exhaustive list of options that are too many to cover in this lab. We will be cover more but be sure to look through this class' webpage to review the most common CSS properties.
If you run into any issues please do not hesitate to contact me:
- jcone@cecil.edu
- (240) 466-1996

Wait! Before you go!
Did you remember to?
- Read through this webpage
- Watch the videos
- Submit Week 02 Fixed-Width Page (CSS) Lab on Blackboard
