
Web Design II
Class 08: Theme Header & FooterTopics
- Partial Templates
- Hooks
- Week 08 Custom Theme Site (header & footer) Lab

Class 08, future is unclear
Partial Templates
Partial Template:
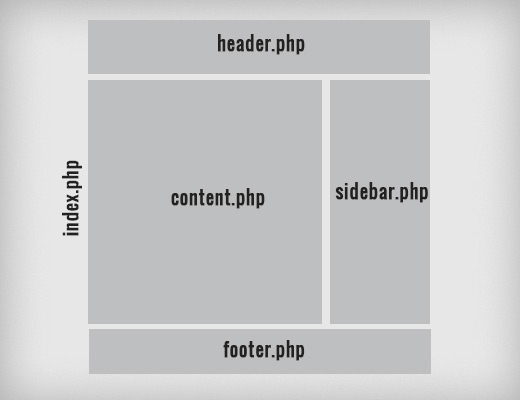
Templates are the shell of the page the user inputs their content into. A partial template is a template for just part of a page. The most common partial templates are header.php, footer.php, content.php, and sidebar.php. These combine together to make a whole page.
This is handy because it allows you to modulate the different aspects of a page. Usually the header and footer are the same from page to page for example and this allows you to attach a template as oppose to having to recreate them for each page template type.
Hooks
Hooks:
Hooks allow a piece of code to interact and modify another piece of code at a specific location/time. They come in to flavors, Actions and Filters.
Actions:
Action hooks allow you to add operations or modify operations of WordPress during specified execution points. We use these to load in files and features.
“an action takes the info it receives, does something with it, and returns nothing. In other words: it acts on something and then exits, returning nothing back to the calling hook.” -wordpress.org
Filters:
Filter hooks change data during WordPress operations. We haven’t used these. They are excellent for modifying content such as applying a class to an element so that you may target it with CSS.
“a filter takes the info it receives, modifies it somehow, and returns it. In other words: it filters something and passes it back to the hook for further use.” -wordpress.org
<?php

function my_files() {
    wp_enqueue_style('main_styles', get_stylesheet_uri());
}

add_action('wp_enqueue_scripts', 'my_files');

?><?php
function custom_css_body_class( $classes ) {
if ( ! is_admin() ) {
$classes[] = 'theme-class';
}
return $classes;
}
add_filter( 'body_class', 'custom_css_body_class' );
?>This example will add theme-class to the body HTML tag.
Hook Triggers:
Most hooks are triggered automatically by certain events that they are attached too. Some however, you will want to declare such as:
- wp_head();
- wp_footer();
This allows actions and filters attached to these events to operate correctly.
<?php

wp_head();

if ( have_posts() ) :
    while ( have_posts() ) : the_post();
        the_title();
        the_content();
    endwhile;
endif;

wp_footer();

?>
Class 08 Custom Theme Site (header & footer) Lab
Custom Theme Site (header & footer) Lab
A header and footer section will be added to the theme “sandwich”.
You will be graded on the following:
- Lab Requirements
-
Techniques and processes covered in the instructional material is followed and implemented.
-
- Creativity & Craftsmanship
-
Excellent design choices, novel & appealing, and solid clean caliber work.
-
Resources:
- Assignment Video Tutorials
- You may watch these tutorial videos below to help you complete your assignment.
Lab Tutorial Slideshow
This tutorial will review WordPress as well as setup a site to apply our future custom theme to.

Your functioning theme displays your pages but not a header or footer. This means there is no menu to navigate from one area to another. In this lab we will create the header and footer partial template files as well as link other files and update what has been created thus far. This will be the longest most complex lab in this course. Hang in there, you can do it.
Click on the > to start
You may use what you created in the last lab .

- You have the required files and folders created for the theme. We are going to create partial template files for the header and footer. These are partial ones because they are only meant to represent one part of a template (in this case the head and footer of the document).
- Visual Studio Code should still have your site folder saved but if it does not follow the same steps as the previous lab.
- In Local, right-click on the site name and select Show Folder. The folder will appear.
- Navigate to yourSiteName/app/public/wp-content/themes. You should see your theme, "yourLastNameTheme." Drag this folder into the window to load the folder location. It will appear in a left panel. You can now begin work.
- Press the New File
 button to create a new file. Save this document as header.php.
 - Press the New File button again. This time save the document as footer.php.
- Press the New Folder
 button. Save this folder as assets.
 - Create two more folders inside the assets folder. Save them folder as css and js.

<?php
function my_files() {
    wp_enqueue_style('main_styles', get_stylesheet_uri());
    wp_enqueue_style('my_responsive_style', get_template_directory_uri() . '/assets/css/responsiveStyle.css');
    wp_enqueue_script('my_responsive_script', get_template_directory_uri() . '/assets/js/responsiveScript.js');
}
add_action('wp_enqueue_scripts', 'my_files');
?>- We want our Wordpress theme to be responsive. To do this we will need to load in CSS and JS to handle the formatting. Lucky us, we already created this in the first four weeks of this class. I have changed it a little just to make sure it functions well enough.
- It would take too long to write this code again so you may just download it here.
- You may review the code but it is the responsive CSS (with small adjustments) from week 02 and the JavaScript navbar (with few adjustments) from week 04.
- Place the responsiveStyle.css in the css folder.
- Place the responsiveScript.js in the js folder.
- Enter:
   wp_enqueue_style('my_responsive_style', get_template_directory_uri() . '/assets/css/responsiveStyle.css');
   wp_enqueue_script('my_responsive_script', get_template_directory_uri() . '/assets/js/responsiveScript.js');
Inside the my_files() function in the Functions.php document. This will load in the CSS and JS so that we may use it in our theme.

- The header and footer must be "attached" to the index.php to tell Wordpress to load them.
- In the header.php enter <h1>This is the header</h1>. In footer.php enter <h1>This is the footer</h1>. This is just so we can test if they are being loaded.
- In the index.php remove wp_head(); and wp_footer(); . These will be inserted in the header and footer templates.
- Enter get_header(); at the top of index.php and get_footer(); at the bottom of the document (but still inside the <?php ?> tags). This will tell Wordpress to load in the header before we place our page content and the footer aftwards.
- Enter <?php wp_head(); ?> in the header.php document. Enter <?php wp_footer(); ?> in the footer.php document. This will recreate the "hooks" Wordpress needs to implement features that we removed earlier.
- Save and test what you have. You should see the HTML text you wrote in the second step.
- The header and footer are attached.
<?php
get_header();
if ( have_posts() ) :
    while ( have_posts() ) : the_post();
        if( !is_front_page() ) :
            the_title();
        else :
            ?>
            <h1><?php echo get_bloginfo( 'name' ); ?></h1>
            <?php
        endif;
        the_content();
    endwhile;
endif;
get_footer();
?>
<?php wp_head(); ?>
<h1>This is the header</h1>
<?php wp_footer(); ?>
<h1>This is the footer</h1>
<!DOCTYPE html>
<html <?php language_attributes(); ?> >
<head>
    <meta charset="<?php bloginfo( 'charset' ); ?>">
    <meta name="viewport" content="width=device-width">
    <?php wp_head(); ?>
</head>- The header is responsible for not only the heading of our site (navigation, heading, logo, etc.) but also the <head> elements. Let's add those first.
- Enter
<!DOCTYPE html>
<html lang="en-US">
<head>
<title>Page Title</title> <meta charset="UTF-8">
<meta name="viewport" content="width=device-width">
</head> - Although technically that code will work it is not dynamic. The theme could be used by different people from different places with different site names. Let's use some PHP to autofill some areas:
<!DOCTYPE html>
<html <?php language_attributes(); ?> >
<head>
<meta charset="<?php bloginfo( 'charset' ); ?>">
<meta name="viewport" content="width=device-width">
<?php wp_head(); ?>
</head> - Notice how we were able to automate some of the content with PHP. The <title> tag was removed because it will be generated in functions.php later using a small bit of code. Also notice that the <?php wp_head(); ?> code was moved into the code we just wrote.

<!DOCTYPE html>
<html <?php language_attributes(); ?> >
<head>
    <meta charset="<?php bloginfo( 'charset' ); ?>">
    <meta name="viewport" content="width=device-width">
    <?php wp_head(); ?>
</head>

<body <?php body_class(); ?>>
<?php wp_body_open(); ?>

   <div class="row">
      <div class="col-2-s">
         <h3>logo</h3>
      </div>
      <div class="col-10-s">
         <h3>navbar</h3>
      </div>
</div>- With the <head> complete it is time to create the shell of the <body>.
- Enter
<body <?php body_class(); ?>>
<?php wp_body_open(); ?>
<div class="row">
<div class="col-2-s">
<h3>logo</h3>
</div>
<div class="col-10-s">
<h3>navbar</h3>
</div>
</div> - The first line of PHP code will assign a class to the body we can use to target with CSS. The second line of PHP code adds a "hook" to allow Wordpress functions to operate.
- The various HTML code is written to create a row and columns with placeholders for a logo image and navbar.

<?php
function my_files() {
    wp_enqueue_style('main_styles', get_stylesheet_uri());
    wp_enqueue_style('my_responsive_style', get_template_directory_uri() . '/assets/css/responsiveStyle.css');
    wp_enqueue_script('my_responsive_script', get_template_directory_uri() . '/assets/js/responsiveScript.js');
}
add_action('wp_enqueue_scripts', 'my_files');

function my_features()
{
    add_theme_support('title-tag');
    register_nav_menu('headerMenuLocation', 'Header Menu');
}
add_action('after_setup_theme', 'my_features');
?>- We wrote a function to load in files but none that add an functionality. Let's add another function to include other Wordpress features.
- In function.php enter:
function my_features()
{
add_theme_support('title-tag');
register_nav_menu('headerMenuLocation', 'Header Menu');
}
add_action('after_setup_theme', 'my_features')
One line of code auto-generate the title for the page. The second line will register a navigation menu we may attach pages to. - There are loads of features that may be added in Wordpress that are actually pretty easy to incorporate like these. You can see some here or do some research and find many others.

<!DOCTYPE html>
<html <?php language_attributes(); ?> >
<head>
    <meta charset="<?php bloginfo( 'charset' ); ?>">
    <meta name="viewport" content="width=device-width">
    <?php wp_head(); ?>
</head>

<body <?php body_class(); ?>>
<?php wp_body_open(); ?>

   <div class="row">
      <div class="col-2-s">
         <h3>logo</h3>
      </div>
   <div class="col-10-s">
        <ul id="navbar">
            <li class="theNav" id="menuBtn"><a href="#" onclick="openMenu()">
                <div id="hamburger">
                    <p>–</p>
                    <p>–</p>
                    <p>–</p>
                </div>
            </a></li>
            <?php
                wp_nav_menu(array(
                    'theme_location' => 'headerMenuLocation',
                    'depth' => '1',
                    'menu_class' => 'theNav'
                ));
            ?>
        </ul>
    </div>
</div>- A header is not complete without a menu.
- In the Dashboard of the site navigate to Appearance>Menus. Create a new menu and select Header Menu in the Display location option.
- Inside the second column div, <div class="col-10-s"> enter:
<ul id="navbar">
<li class="theNav" id="menuBtn"><a href="#"onclick="openMenu()">
<div id="hamburger">
<p>–</p>
<p>–</p> <p>–</p>
</div>
</a></li>
<li><a href="#">link 01</a></li>
<li><a href="#">link 01</a></li>
<li><a href="#">link 01</a></li>
<li><a href="#">link 01</a></li>
</ul> - This will make a static menu. We want a dynamic one. replace the <li><a href="#">link 01</a></li> lines with:
<?php
wp_nav_menu(array(
'theme_location' => 'headerMenuLocation',
'depth' => '1',
'menu_class' => 'theNav'
));
?> - Now the code will dynamically load the menu. We may format this however we wish later on.

- Often themes will have a place for the user to upload a logo image that will be represented in the menu or other places. It is a relatively small amount of work to include this feature.
- First the feature must be loaded into the functions.php for use. Enter:
add_theme_support(
'custom-logo',
array( 'height' => $logo_height,
'width' => $logo_width,
'flex-height' => true,
'flex-width' => true,
)
);
Inside the my_features() function. - In the header.php, inside the first column <div class="col-2-s"> enter:
<?php
if ( function_exists( 'the_custom_logo' ) ) {
the_custom_logo();
}
?>
Now a logo may be added to the first column of this section. - In the Wordpress Dashboard navigate to Appearance>Customize. Select Site Identity from the menu on the left. Inside you will see an option to upoad a logo image. Upload an image and it should appear.
<!DOCTYPE html>
<html <?php language_attributes(); ?> >
<head>
    <meta charset="<?php bloginfo( 'charset' ); ?>">
    <meta name="viewport" content="width=device-width">
    <?php wp_head(); ?>
</head>

<body <?php body_class(); ?>>
<?php wp_body_open(); ?>

   <div class="row">
    <div class="col-2-s">
        <?php
            if ( function_exists( 'the_custom_logo' ) ) {
                the_custom_logo();
            }
        ?>
    </div>
   <div class="col-10-s">
        <ul id="navbar">
            <li class="theNav" id="menuBtn"><a href="#" onclick="openMenu()">
                <div id="hamburger">
                    <p>–</p>
                    <p>–</p>
                    <p>–</p>
                </div>
            </a></li>
            <?php
                wp_nav_menu(array(
                    'theme_location' => 'headerMenuLocation',
                    'depth' => '1',
                    'menu_class' => 'theNav'
                ));
            ?>
        </ul>
    </div>
   </div>
<?php
function my_files() {
    wp_enqueue_style('main_styles', get_stylesheet_uri());
    wp_enqueue_style('my_responsive_style', get_template_directory_uri() . '/assets/css/responsiveStyle.css');
    wp_enqueue_script('my_responsive_script', get_template_directory_uri() . '/assets/js/responsiveScript.js');
}
add_action('wp_enqueue_scripts', 'my_files');

function my_features()
{
    add_theme_support('title-tag');
    register_nav_menu('headerMenuLocation', 'Header Menu');
    add_theme_support(
	'custom-logo',
		array(
			'height'      => $logo_height,
			'width'       => $logo_width,
			'flex-height' => true,
			'flex-width'  => true,
		)
    );
}
add_action('after_setup_theme', 'my_features');
?>
<?php wp_footer(); ?>
   <div class="row">
      <div class="col-6-s">
         <?php dynamic_sidebar('Footer Sidebar Left'); ?>
      </div>
      <div class="col-6-s">
         <?php dynamic_sidebar('Footer Sidebar Right'); ?>
      </div>
   </div>
</body>
</html>
<?php
function my_files() {
    wp_enqueue_style('main_styles', get_stylesheet_uri());
    wp_enqueue_style('my_responsive_style', get_template_directory_uri() . '/assets/css/responsiveStyle.css');
    wp_enqueue_script('my_responsive_script', get_template_directory_uri() . '/assets/js/responsiveScript.js');
}

add_action('wp_enqueue_scripts', 'my_files');

function my_features()
{
    add_theme_support('title-tag');
    register_nav_menu('headerMenuLocation', 'Header Menu');
    //add_image_size('pageBanner', true);

	add_theme_support(
		'custom-logo',
		array(
			'height'      => $logo_height,
			'width'       => $logo_width,
			'flex-height' => true,
			'flex-width'  => true,
		)
	);

    register_sidebar( array(
        'name'          => __( 'Footer Sidebar Left', 'theme_name' ),
        'id'            => 'sidebar-1',
        'before_widget' => '<aside id="%1$s" class="widget %2$s">',
        'after_widget'  => '</aside>',
        'before_title'  => '<h3 class="widget-title">',
        'after_title'   => '</h3>',
    ) );

    register_sidebar( array(
        'name'          => __( 'Footer Sidebar Right', 'theme_name' ),
        'id'            => 'sidebar-2',
        'before_widget' => '<aside id="%1$s" class="widget %2$s">',
        'after_widget'  => '</aside>',
        'before_title'  => '<h3 class="widget-title">',
        'after_title'   => '</h3>',
    ) );
}

add_action('after_setup_theme', 'my_features');
?>- The footer of a site often feature a secondary menu as well as other components. Instead of creating another menu (like header menu). Let's instead include a widget area so the user may place any widget they like inside it.
- First the feature must be register widgets in the functions.php for use. Enter:
register_sidebar( array(
'name' => __( 'Footer Sidebar Left',
'theme_name' ),
'id' => 'sidebar-1',
'before_widget' => '<aside id="%1$s" class="widget %2$s">',
'after_widget' => '</aside>',
'before_title' => '<h3 class="widget-title">',
'after_title' => '</h3>',
) );
register_sidebar( array(
'name' => __( 'Footer Sidebar Right',
'theme_name' ),
'id' => 'sidebar-2',
'before_widget' => '<aside id="%2$s" class="widget %2$s">',
'after_widget' => '</aside>',
'before_title' => '<h3 class="widget-title">',
'after_title' => '</h3>',
) ); - Now let's add the widgets to the footer.php as well as other necessary code:
<?php wp_footer(); ?>
<div class="row">
<div class="col-6-s">
<?php dynamic_sidebar('Footer Sidebar Left'); ?>
</div>
<div class="col-6-s">
<?php dynamic_sidebar('Footer Sidebar Right'); ?>
</div>
</div>
</body>
</html>
This will add two columns and place our widgets inside them.

- You may view your while working on it but also from the Local interface by pressing the View Site button at the top right of the program. When you are happy with it, it is time to export it out.
- In Local right-click on the site name in the list on the left. In the popup choose Export. Don't enter anything in the window. Press Export. In the popup choose where you want to export and export.
- Now, log into Blackboard (Here) and click on this course. Inside the course, select Week 08, then the Class 08: Custom Theme Site (header & footer) Lab folder, then the assignment with the same name. Finally, Attach the zipped file.
<?php
get_header();

if ( have_posts() ) :
    while ( have_posts() ) : the_post();
        if( !is_front_page() ) :
            the_title();
        else :
            ?>
            <h1><?php echo get_bloginfo( 'name' ); ?></h1>
            <?php
        endif;
        the_content();
    endwhile;
endif;

get_footer();
?>
<!DOCTYPE html>
<html <?php language_attributes(); ?> >
<head>
    <meta charset="<?php bloginfo( 'charset' ); ?>">
    <meta name="viewport" content="width=device-width">
    <?php wp_head(); ?>
</head>

<body <?php body_class(); ?>>
<?php wp_body_open(); ?>

<div class="row">
    <div class="col-2-s">
        <?php
            if ( function_exists( 'the_custom_logo' ) ) {
                the_custom_logo();
            }
        ?>
    </div>
    <div class="col-10-s">
        <ul id="navbar">
            <li class="theNav" id="menuBtn"><a href="#" onclick="openMenu()">
                <div id="hamburger">
                    <p>–</p>
                    <p>–</p>
                    <p>–</p>
                </div>
            </a></li>
            <?php
                wp_nav_menu(array(
                    'theme_location' => 'headerMenuLocation',
                    'depth' => '1',
                    'menu_class' => 'theNav'
                ));
            ?>
        </ul>
    </div>
</div>
<?php wp_footer(); ?>
   <div class="row">
      <div class="col-6-s">
         <?php dynamic_sidebar('Footer Sidebar Left'); ?>
      </div>
      <div class="col-6-s">
         <?php dynamic_sidebar('Footer Sidebar Right'); ?>
      </div>
   </div>
</body>
</html>
<?php
function my_files() {
    wp_enqueue_style('main_styles', get_stylesheet_uri());
    wp_enqueue_style('my_responsive_style', get_template_directory_uri() . '/assets/css/responsiveStyle.css');
    wp_enqueue_script('my_responsive_script', get_template_directory_uri() . '/assets/js/responsiveScript.js');
}

add_action('wp_enqueue_scripts', 'my_files');

function my_features()
{
    add_theme_support('title-tag');
    register_nav_menu('headerMenuLocation', 'Header Menu');
    //add_image_size('pageBanner', true);

	add_theme_support(
		'custom-logo',
		array(
			'height'      => $logo_height,
			'width'       => $logo_width,
			'flex-height' => true,
			'flex-width'  => true,
		)
	);

    register_sidebar( array(
        'name'          => __( 'Footer Sidebar Left', 'theme_name' ),
        'id'            => 'sidebar-1',
        'before_widget' => '<aside id="%1$s" class="widget %2$s">',
        'after_widget'  => '</aside>',
        'before_title'  => '<h3 class="widget-title">',
        'after_title'   => '</h3>',
    ) );

    register_sidebar( array(
        'name'          => __( 'Footer Sidebar Right', 'theme_name' ),
        'id'            => 'sidebar-2',
        'before_widget' => '<aside id="%1$s" class="widget %2$s">',
        'after_widget'  => '</aside>',
        'before_title'  => '<h3 class="widget-title">',
        'after_title'   => '</h3>',
    ) );
}

add_action('after_setup_theme', 'my_features');
?>
The theme now has basic header and footer partial templates. This gives your site a proper menu as well as an area to apply any widgets you may want. It was a lot of work but the rest of the semester will be easier from here on out.
If you run into any issues please do not hesitate to contact me:
- jcone@cecil.edu
- (240) 466-1996

Wait! Before you go!
Did you remember to?
- Read through this webpage
- Watch the videos
- Submit Class 08 Custom Theme Site (header & footer) Lab on Blackboard
