CMS Site (subpages) Lab

Introduction
Quite a bit has been completed on the site. The necessary software has been installed. The general settings have been applied. The last thing we did was complete the homepage. In this lab we will create two subpages and complete the site.
Click on the > to start
You may use your lab from last the last lab as the starting point.
Subpage Creation
CMS Site (subpages) Lab

Clone the Homepage

Instructions
- You have a homepage but no subpages. Much like when we hard-code sites we will duplicate the homepage to make the subpages so we don't have to start from scratch.
- Open Local.
- Click on your site name. Press START SITE on the top right to make the site "live".
- Press on Admin. The browser will open to the admin login page. Log in (should be vcp and vcp).
- Click on Pages in the Dashboard.
- In the pages section, hover over the Homepage. Press Clone from the menu that appears below it. This will create a duplicate of the Homepage (this option is available because we installed the Yoast Duplicate Post plugin).
- Hover over one the duplicate page and select Quick Edit. Enter "Contact Us" in the Title field. Change the Status from Draft to Published. Once completed press Update.
- We have now created one subpages but it will need to be formatted so it is not the same as the homepage.
- Hover over the default pages Wordpress created (Privacy Policy and Sample Page) and select Trash to remove them.
Contact Us Page
CMS Site (subpages) Lab
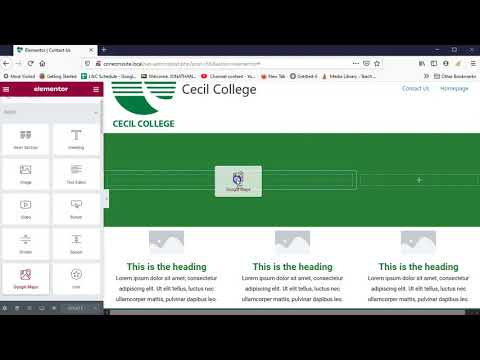
Finished Contact Us Page

Instructions
- Let's design the first subpage, Contact us.
- In the Page section hover over Contact Us page. Select Edit with Divi from the menu that appears below it. You will be brought to the font-end of the page with the Elementor page builder enabled.
- Press the Settings button at the most bottom-left of the page. The Page Settings panel will appear. Turn off Hide Title (no). Press Update. This will put the page title back on the page.
- Right-click over the text and button in the first section and select Delete to remove those elements in the section.
- Right-click over the section and select Edit Section. Edit Section will appear in the left panel. Change the Content Width to Boxed. Press Update.
- Right-click over the section and select + Add New Column.
- Press the left column
 Edit Column button. Change the Column Width (%) to "67". This will make the column 2/3 and 1/3.
 - Press the Elements button to return to the Elements panel. Press Update.
- In the Elements panel click and drag the Google Maps element onto the inside the first column of the section. Enter "1 Seahawk Dr, North East, MD 21901" in the Location text field. Adjust the Height to "500". Press Update to update and then the Elements button to return to the Elements panel.
- Click and drag the Heading element onto the inside the second column of the section. Adjust it's settings and enter "Visit Us" in the Title field. Press Update and .
- Click and drag the Text Editor element below the last element. Adjust it's settings and enter "1 Seahawk Dr, North East, MD 21901" in the Title field. Press Update and .
- Click and drag the Divider element below the last element. Adjust it's settings then Press Update and .
- Click and drag the Heading element below the last element. Adjust it's settings and enter "Follow Us" in the Title field. Press Update and .
- Click and drag the Social Icons element below the last element. Adjust it's settings then press Update and .
- We must remove the remaining sections. Hover over each section and press the in the
 that pops up above the section to delete them.
 - Make any changes that you want then press Update button.
- Press then EXIT TO DASHBOARD to return to the Dashboard.
Student Life Page
CMS Site (subpages) Lab

Finished Student Life Page

Instructions
- Let's design the second subpage, Student Life.
- In the pages section, hover over the Contact Us page. Press Clone from the menu that appears below it. This will create a duplicate.
- Hover over one the duplicate page and select Quick Edit. Enter "Student Life" in the Title field. Change the Status from Draft to Published. Once completed press Update.
- Hover over the Student Life page again. Select Edit with Divi from the menu that appears below it. You will be brought to the font-end of the page with the Elementor page builder enabled.
- Right-click over the elements in the section and select Delete to remove them.
- Right-click over the left column Edit Column button and select Delete.
- In the Elements panel click and drag the Video element onto the . Adjust the settings. Press Update to update and then the Elements button to return to the Elements panel.
- Click and drag the Heading element below the last element. Adjust its settings and enter "Student Experience" in the Title field. Press Update and .
- Click and drag the Inner Section element below the last element.
- Right-click over an Edit Column button and select Add Column. Do this twice, resulting in four total columns.
- Click and drag the Testimonial element into each column. Adjust its settings then Press Update and .
- Click and drag the Star Rating element under each testimonial element. Adjust their settings then Press Update and .
- Make any changes that you want to the page then press the Update button.
- Press then EXIT TO DASHBOARD to return to the Dashboard.
Menu
CMS Site (subpages) Lab
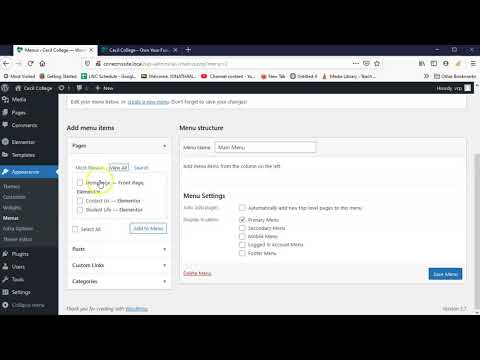
Menu Creation

Instructions
- Now that there are multiple real pages we can create and apply a proper menu.
- In the Dashboard navigate to Appearance>Menus.
- Enter "Main Menu" in the Menu Name field and toggle on Primary Menu. Press Create Menu.
- In the left panel Add menu items under the Pages section select the View All tab. Toggle on Select All and click on Add to Menu.
- Make any adjustments you would like and press Save Menu.
- Depending on the theme you have installed there may be more options in the menu area or in customize. In our case this is good enough.
Theme Editor
CMS Site (subpages) Lab
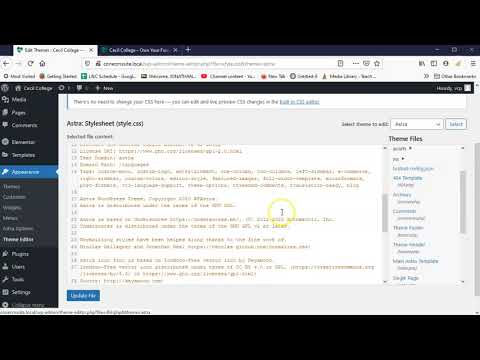
Theme Editor

Instructions
- Your site is more or less complete. It could definitely use some polish but it is good enough for instructional purposes. The theme and plugins we installed allow us to control the look of the site. Some are more robust than others. If the theme/plugins installed do not include options you desire you can apply style manually. Let's explore changing the theme CSS directly.
- In the Dashboard navigate to Appearance>Theme Editor.
- Under Theme Files select Stylesheet (should be by default).
- Scroll to the bottom of the page. Here you can apply your own CSS to the theme stylesheet.
- Try adding:
background-color: #e9e9e9; - Press Update File.
- In the upper-left of the Dashboard press the site name to preview your site. You should see that the background color has now changed.
- Warning! Although this method does work it is not the preferred way of applying CSS. Every time your theme gets updated you will lose any CSS rules you have written.
Additional CSS
CMS Site (subpages) Lab
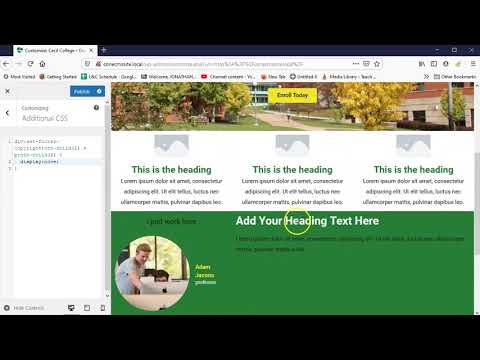
Customize

Instructions
- Besides adding CSS rules to the theme stylesheet you can apply CSS through the customizer.
- If you are logged in as Admin you can access Customize from the front-end. In the black admin bar at the top of the page select Customize. If you are in the Dashboard you can navigate to Appearance>Customize.
- In Customize navigate to Additional CSS. Here you can add CSS rules and see them applied instantly.
- It can be difficult to target elements. One way to do this is to use the browser tools. Find the element you wish to target (let's try the theme name at the bottom of the page). Right-click over the element and select Inspect or Inspect Element from the popup. This will open the inspector panel with the html highlighted.
- Right-click on the element in the inspector panel and select Copy>Copy selector or Copy>CSS Selector.
- In the Additional CSS panel, right-click in the text-field and paste. You have your selector!
- Next, write the CSS rule like you would any other. For example:
.footer-credits {
display: none; - You will see your CSS applied. You may do this to as many elements as you like.
Final Review and Submission
CMS Site (subpage) Lab

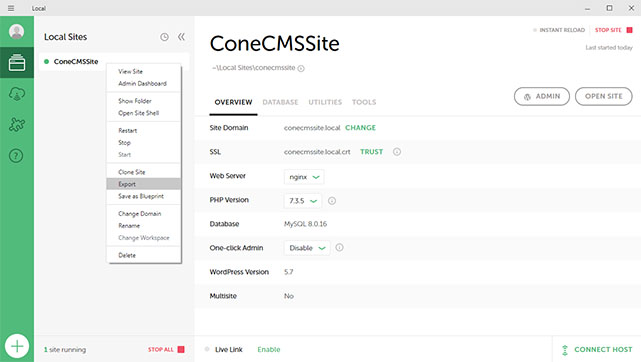
Local Export
Instructions
- You should explore and add anything you would like in the site. The best way to learn is just to play around with it. When you are happy you are ready to export it.
- In Local right-click on the site name in the list on the left. In the popup choose Export. Don't enter anything in the window. Press Export. In the popup choose where you want to export and export.
- Now, log into Blackboard (Here) and click on this course. Inside the course, select Class 13, then the Class 13: CMS Site (subpage) Lab folder, then the assignment with the same name. Finally, Attach the zipped file.
Lab Synopsis
Reflection
You have officially completed the Wordpress lab series! You can see what is possible with CMS and how user friendly it is. Next up is the Final Project. It may be whatever you like using the same general process we covered in these labs.
If you run into any issues please do not hesitate to contact me:
- jcone@cecil.edu
- (240) 466-1996