Divi Child Site (divi setup) Lab
Introduction
We will start a new lab series, Divi Child Site. Divi is a premium paid Wordpress theme that is robust, highly customizeable, and a professional standard. In fact this site is made with it! On top of this theme we will build a child theme which allows you to add your own code without disturbing the original theme for ultimate customization. In this lab we will install Divi, adjust settings, and create pages.
Click on the > to start
There are no lab materials this week
Create Local Site
Divi Child Site (divi setup) Lab

Instructions
- You should already have Local by Flywheel installed since it was required for the last assignments. Be sure you have the latest version installed. We need to start a new site to apply the Divi theme to.
- In Local press the
 (Add Site) button.
 - Choose a name for the site, YourLastNameDiviSite.
- Accept the defaults.
- Use vcp for the wordpress username and wordpress password. This way I am able to access it for review later.
- Click Add Site. Your PC will have a popup asking for permissions. Just allow.
Site Created in Local

Local by Flywheel
Divi Theme
Divi Child Site (divi setup) Lab

Divi Theme

Instructions
- Divi is a premium theme and is not available in the Wordpress Add Theme section like most other themes. You have to purchase it from Elegant Themes and then upload it your site. In our case you will download it from the course on Blackboard under this class section.
- You may use this theme on your computer locally but you may NOT use it on a live site. If you decide you wish to use the Divi theme for an online site you will need to purchase your own license.
- Once you download the zip file log into your site using Local. in the Dashboard navigate to Appearance>Themes. Click on Add New. You will then be in the area to search for a new theme. Instead of searching click on Upload Theme. Click Choose File and navigate to the Divi zip folder to install it. Then choose to activate it.
- The Divi theme is now installed.
Divi Theme Options
Divi Child Site (divi setup) Lab

Divi Theme Options Page

Instructions
- Before you start building any pages it is usually best to explore a theme's options and configure it's settings. Now that the Divi theme is installed you will see a new section (in the left menu panel) in the admin dashboard called Divi.
- Navigate to Divi>Theme Options. These are the global settings of the theme. We should make some changes.
- Upload a logo image.
- Decide on a color pallete (you may use a tool such as Adobe Color). Apply these colors to the Color Pickers Default Palette.
- Turn off the various social media icons.
- Press Save at the very bottom of the window.
- You may explore the other options but that is good enough for now.
Divi Customizer
Divi Child Site (divi setup) Lab

Divi Customizer

Instructions
- The other major global settings for the Divi theme exists in the Customizer. Divi's Customize is very robust (almost daunting). You may access it a number of ways such as the traditional ways. Since we are already on the back-end you can also get to Customize by navigating to Divi>Theme Customizer.
- In the left panel you will see settings for most aspects of the site. The most important to adjust is the General Settings. Here you can configure the site identity, layout design, typography, and background.
- Explore the other sections in the Customize panel. Go through each area and change the settings to see what the options are. Don't worry about it looking exactly like mine. It is more important to just experiment.
Divi Page Creation
Divi Child Site (divi setup) Lab
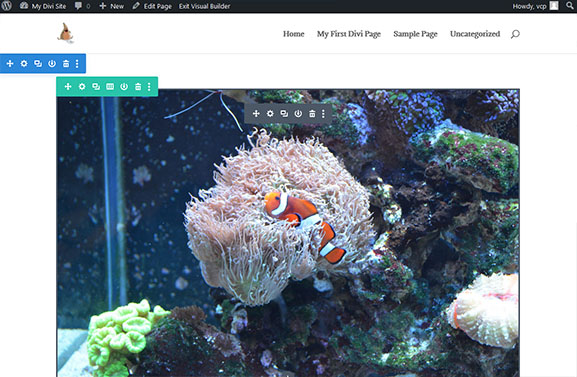
Divi Section (blue), Row (green), Module (grey)
Instructions
- Now that the major Divi settings have been set let's create a basic page. Divi comes installed with it's own front-end site builder called Visual Builder. It is like a very user friendly robust system that uses sections, rows/columns, and modules. It is somewhat similar to using a WYSIWYG (what you see is what you get) of Bootstrap.
- First publish and exit the Customizer (upper left Publish/Update button then the X).
- Back in the Dashboard go to Pages. Click on Add New.
- In the Add New Page area select Use Divi Builder (you may see a popup to take a tour, just choose to start building).
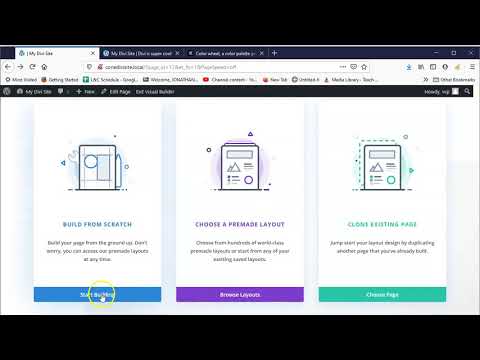
- You will be given three options; BUILD FROM SCRATCH, CHOOSE A PREMADE LAYOUT, and CLONE EXISTING PAGE. Choose BUILD FROM SCRATCH.
- Divi will automatically ask what row and columns to create. Choose a single large column (first option).
- Divi will automatically ask what module to enter into the column (modules are the type of content). Choose Image.
- The module settings window will pop up. Press the gear icon in the empty picture box. Select an image to use and accept it. In the module settings window you can make lots of changes.
Divi Modules
Divi Child Site (divi setup) Lab

More modules added (feel free to experiment)

Instructions
- Let's add some more to the page.
- Hover over the row and press the to add a new row. Choose the four column option. Select the Call To Action Module.
- Press the inside each column of the row and add Call To Action to each.
- Hover over the section and press the to add a new section. Choose Regular. Choose the two column row then Testimonial. Press the inside the other column of the row and add Text.
- In order to differentiate the section, hover over the section and click on the . Change the background color in the settings window.
- Feel free to add more sections, rows/columns, and modules.
- At the bottom of the page click on the page options. A row of icons will appear. If you select the
 Layers button you can interact with the elements of your page there. Press the Page Settings button. Enter My First Divi Page in the Title. Accept the results.
 - While the page options are still expanded, press the Publish button. You can exit the visual builder by pressing Exit Visual Builder at the top of the page.
Final Review and Submission
Custom Theme Site (wordpress setup) Lab
Instructions
- Please feel free to explore Divi and add extra elements. The best way to learn is just to play around with it.
- When you are happy with your page you can export it for submission.
- In Local right-click on the site name in the list on the left. In the popup choose Export. Don't enter anything in the window. Press Export. In the popup choose where you want to export and export.
- Now, log into Blackboard (Here) and click on this course. Inside the course, select Class 11, then the Class 11: Divi Child Site (divi setup) Lab folder, then the assignment with the same name. Finally, Attach the zipped file.
Lab Synopsis
Reflection
In this lab we installed and explored Divi some. Hopefully you got a taste at how capable it is. In the next lab we will explore it further as well as create more finished pages.
If you run into any issues please do not hesitate to contact me:
- jcone@cecil.edu
- (240) 466-1996