Basic Platformer in Godot
This tutorial will cover how to create a basic “Mario” style platformer game inside the Godot game engine
Topics
- Godot
- Project Creation
- Scene Creation
Godot
Godot Engine is a feature-packed, cross-platform game engine to create 2D and 3D games from a unified interface. It provides a comprehensive set of common tools, so that users can focus on making games without having to reinvent the wheel. Games can be exported with one click to a number of platforms, including the major desktop platforms (Linux, macOS, Windows), mobile platforms (Android, iOS), as well as Web-based platforms and consoles. -Godot
Click this image(link) to go to the Godot Web Editor –>
Create new project
- Press the Start Godot editor button
- In the Projects panel, press + Create
- In the Create New Project panel, enter your game name, Platformer
- Press Create and Edit
- You have made your first game…goodbye

Files and Folder Structure
- Right-click inside the FileSystem panel (bottom-left) and select New Folder…
- Write assets in the popup window. Press Ok
- Create two more folders, scenes and scripts using the same process
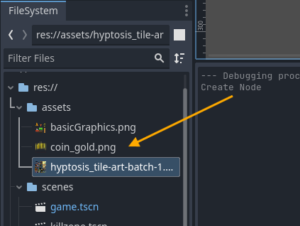
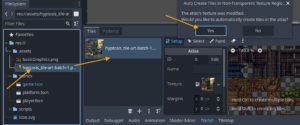
- Download the image in the link (figured right)
- Drag the image onto the assests folder in the FileSystem panel
Click this link for a resource of game art (specifically a character)
Click this link for browser-based 2D animated sprite software
Godot Structure
- Is built on nodes. Nodes have properties and functions that allow them to do certain things like display an image, apply physics, play a sounds, etc.
- These nodes may be combined together to create a scene. A scene may be used over and over again, such as an enemy or coin
- The nodes and scene are nested (parented) together to create a scene tree which makes up the hiearchy of the game
Game Scene Creation
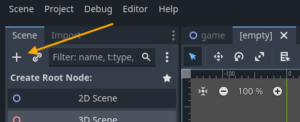
- Click on the 2D Scene option in the Scene panel (top left). This will be the root (top element in the hiearchy) node.
- Double click on the resulting Node2D in the Scene panel and rename it Game. Press ctrl + s, navigate to the scenes folder, and press Save
- Press the play button (top right). A prompt will display, saying a main scene has not been defined. Press Select Current. A game preview window will be active. We haven’t made anything yet so press the Editor button at the top of the screen to switch back to the editor. Press the stop button (top right) to stop the game from running.
- If you expand the scenes folder in the FileSystem panel you will see that game.tscn is now present and highlighted blue.
Player Scene Creation
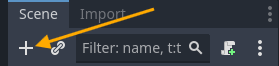
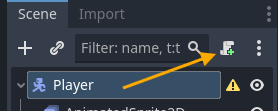
- Press the + to the right of the game tab above the viewport (area you see the game space in) to create a new scene
- Press the + at the top of the Scene panel to create the root node
- Choose CharacterBody2D from the Create New Node popup
- Press Create
- Press the + in the Scene panel to add another node to our scene
- Type in sprite in the Search box and select AnimatedSprite2D. Press Create
- Select the AnimatedSprite2D node and expand Animation. In the Sprite Frames subsection change the value from <empty> to New SpriteFrames
- Click on SpriteFrames option you just turned on. The Sprite Frames panel will appear at the bottom of the window

- Press the Add frames from sprite sheet button
- Navigate to the assets folder and select the sprite sheet. Press Open
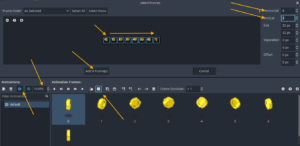
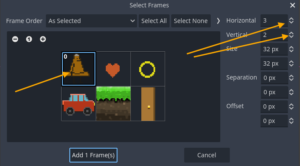
- Adjust the Horizontal and Vertical to match the number of rows and columns in the sprite sheet inside the Select Frames window. Click on the character (or multiple frames if you have it animated). Press Add 1 Frame(s)
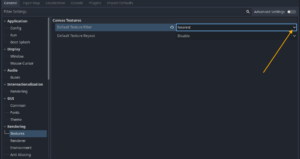
- The character will look blurry which is not great for pixel-based artwork. To change this, select Project>Project Settings… in the topmost menu. Under Rendering>Textures, change the Default Texture Filter from Linear to Nearest. Press Close
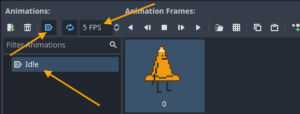
- Let’s make some adjustments to the animation. Double-click default and change the name of the animation to idle. Adjust the Animation Speed (currently 5 FPS) to your desired amount. Press the Autoplay on Load button to make it automatically play by default
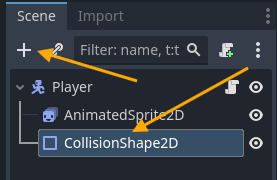
- We need to add a collision shape. In the Scene panel press the +, search for CollsisionShape2D, and press Create
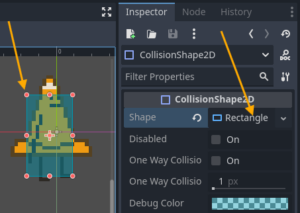
- With the CollisionShape2D node selected change select Rectangle next to the Shape attribute. Use the handles to adjust the shape and position of the node to better match your artwork
- Double-click on the root node (CharacterBody2D) and rename it Player. Save the player scene by pressing ctrl + s (or cmd + s), navigate to the scenes folder, write player as the Filename, press Save.
Camera Creation
- Select the game tab (above viewport) to return to the main scene of the game. Select the game node in the Scene panel
- Press the + in the Scene panel to create a new node. Select Camera2D from the options and press Create
- The default size of the camera is pretty large. Change the Zoom property in the Inspector panel to 4 (or whatever size works for you)
- There is nothing in our scene for our camera to look at. Drag the player.tscn from the FileSystem panel into the viewport window.
- Click and drag the Camera2D node in the viewport window to center on the player
- Parent the camera to the player so it follows it. Drag the camera onto the player.
- In order to smooth out the camera following movement, expand Positioning Smoothing, and Click Enabled


Environment Assets
Environments are the primary visuals of your game. They may take a long time to produce. I would suggest using Photopea (linked figure right) to create your own. However you may use the other link, OpenGameArt.org to download some for now.
Once you have created or downloaded your background images. You should import them into Godot. Click and drag the image file into the assets folder in the FileSystem panel
Click this link for a resource of game art (specifically environment)

Click this link to go to browser based image editor/creator similar to Photoshop
Platform Scene
- Press the + in the Scene panel to create a new node. Select the AnimatableBody2D and press Create. Rename the node platform by double-clicking on the name
- Select the platform node and press the + to create a child node. Select CollisionShape2D and press Create
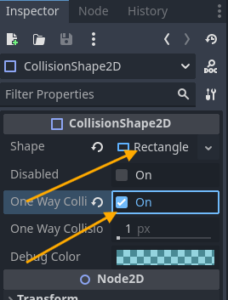
- With the CollisionShape2D node selected choose Rectangle for the value of the Shape property in the Inspector panel. Check on the One Way Collision property
- Select the platform node and press the + to create a child node. Select Sprite2D and press Create


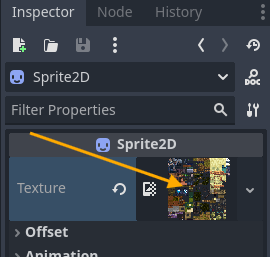
- Click and drag the image with the platform attached (probably a tileset image) onto <empty> value of the Texture property in the Inspector panel
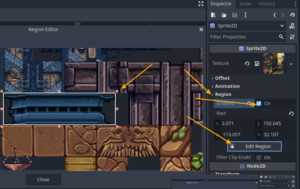
- This image has many tiles on it. We only want one small piece. In the Inspector panel, expand Region, turn on Enabled, and press Edit Region. Click and drag over the area of the image you want to use for the platform. Press Close
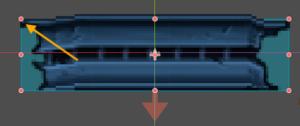
- Select the CollisionShape2D node. Resize it to the size of the image
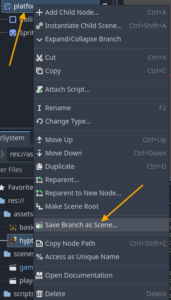
- Select the top most node of the platform, platform. Reposition it in the game where you’d like. Right-click on the platform in the Scene panel. Select Save Branch as Scene. In the popup window, save the scene as platform inside the scenes folder
Player Script Creation
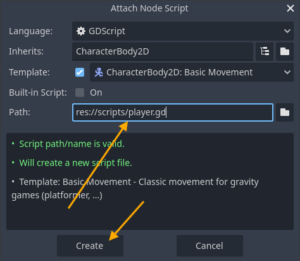
- Go back to the player scene by click on the player tab (to the right of the game tab). Select the Player root node (CharacterBody2D node). Press the Attach Script button
- A popup window will appear. The defaults are mostly ok (including the Template, Basic Movement) except for the path. Click the folder icon and change the path to the scripts folder. Once complete, press Create
- Hit the Run Project button (play button at top right). You will now see your character land on the platform and you will be able to move and jump around! Once satisfied, press the x next to Game window tab (very top center).
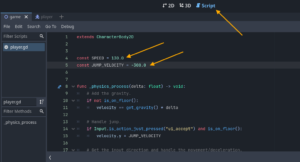
- The player moves to fast and jumps too high. Let’s adjust that. Press the Script tab to view your scripts (currently only player.gd). Change the values assigned to SPEED and JUMP_VELOCITY (I chose 130 and -300 respectively). Press ctrl + s to save.
Tilesets and Tilemaps
Tilesets are a collection of 2D graphics organized in a grid. Very similar to a spritesheet but instead of frames of an animation they are typically used for static objects
Tilemaps are the applied use of tilesets. When you create a tilemap you layout the various tileset graphics into a game level. Great examples of tilesets and tilemaps are the environments present in retro platformer and top-down rpg games like Mario or Zelda.

Tileset Creation
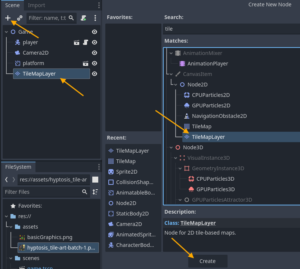
- Press the + to add a new node in the Scene panel. Select TileMapLayer and press Create
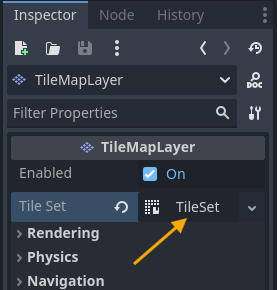
- In the Inspector panel select New TileSet to create a new tile set
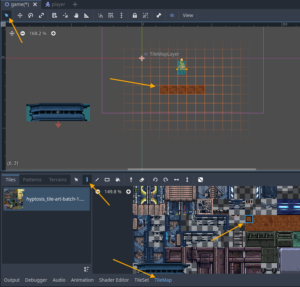
- Drag the tileset image into the TileSet panel. A popup will ask if you would like to automatically create tiles in the atlas. Press Yes
- If the grid is incorrect you may need to adjust the tile size. If so, click on TileSet in the Inspector panel, and adjust the Tile Size property as needed

- Switch to the TileMap panel (bottom of the screen). Select the grid element you wish to pain, make sure you are in paint mode, in the viewport make sure you are in select mode, then start “painting” your tilemap.
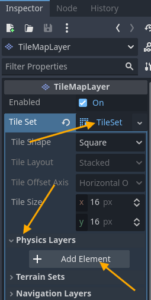
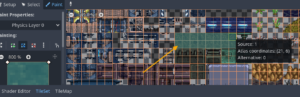
- If you play the game you will notice the player falls straight through the environment. In the Inspector panel, click on TileSet value on the TileSet property. Options will expand. Expand the Physics Layers option. Press + Add Element
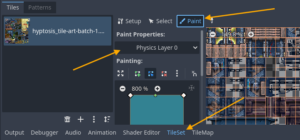
- Click back onto the TileSet panel. Choose the Paint option. Select Physics Layer 0 in the Paint Properties
- Click on all blocks that should collide with the player. Now the player shouldn’t go through those blocks
Player Death
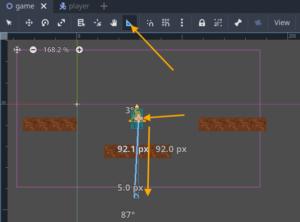
- Let’s restrict the camera movement so it doesn’t follow the player off-screen. Select the Ruler Mode. Click and drag from the camera’s position downward to see how far you want to allow the camera to move (you will see a number appear)
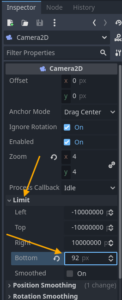
- Select the Camera2D node in the Scene panel. In the Inspector panel expand the Limit section. Enter the number you found using the Ruler Mode for the Bottom number
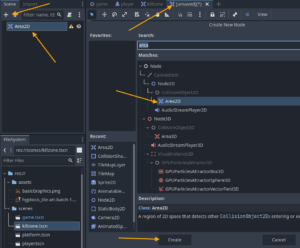
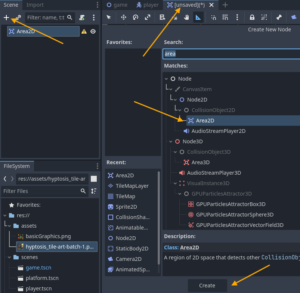
- Let’s kill the player! Press the + at the top of the viewport to create a new scene. Press the + in the Scene panel. Search for and create an Area2D node that is used for detection
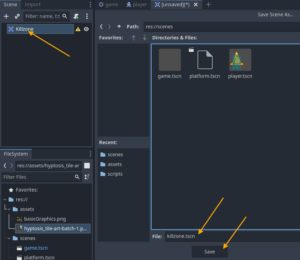
- Rename the Area2D node to Killzone. Press ctrl + s to save the scene, navigate to the scenes folder, and name it killzone
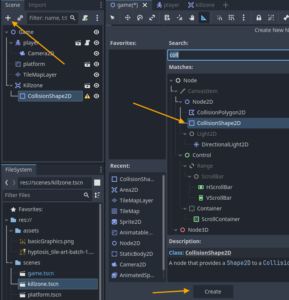
- Go back to the game scene (select game tab at top). Click and drag the killzone scene onto the Game root node in the Scene panel. Press the + in the Scene panel to add a new node. Select CollisionShape2D and press Create
- With the CollisionShape2D node selected choose the WorldBoundaryShape2D value for the Shape property in the Inspector panel. Now move the Killzone to just below the camera view (you will need to switch to the move tool [press w])
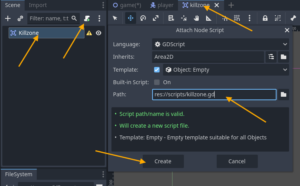
- The Killzone isn’t going to do anything quite yet. It needs a script to detect the player and reset the game. Switch back to the killzone scene (tab at top of viewport window). Select the Killzone node and press the Attach Script button. In the Attach Node Script popup window, click on the folder icon and navigate to the Scripts folder in the popup window. Press Open. Now in the previous window press Create

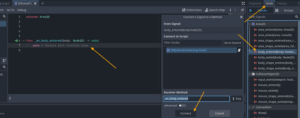
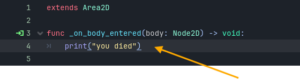
- The center window will automatically switch to the Script panel. Make sure the Killzone node is selected and click on the Node panel (far right side, beside the Inspector panel). Under the Area2D section, double-click on body_entered(body:Node2D). Press Connect to accept the options and enter the code snippet
- Currently pass is written when something enters the body which means it does nothing. To test it, replace pass with, print(“you died”). Press ctrl + s to save the script. This will now print you died to the console when something enters it
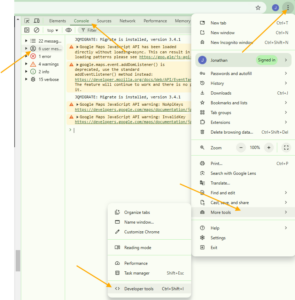
- If you test the script it will not work correctly. That is because the web browser has security protocols that prevent Godot from printing to the screen. You can however view your messages using the developer mode in the browser. For example, In Chrome press the three dots (called ellipse [makes no sense I know]) at the top right of the window for the options. Towards the bottom you will see more tools >. Choose that, then <> Developer tools. A panel will pop out. In the panel choose Console. In there you will see options to just view user messages. Here you can see Godot’s console prints. It is a very convoluted work around
- Currently the killzone script will run if anything runs into it. We want it to only activate if the player enters it. In the player scene, select the Player node. In the Inspector panel under the CollisionObject2D, expand Collision. Change the Layer from 1 to 2. This means the player collision is on layer two. Press ctrl + s to save your changes
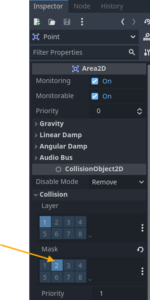
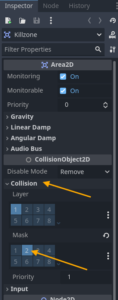
- Now we need to make it so the killzone only reads objects on layer 2. Switch to the killzone scene. Select the Killzone node in the Scene panel. In the Inspector panel, under CollisionObject2D, expand Collision. Change the Mask from 1 to 2. This means the killzone collision detection will detect only layer two, where the player collision is set. Press ctrl + s to save
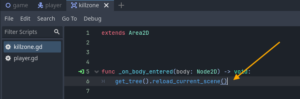
- Now that the detection is working correctly we can have it reset the game instead of printing you died. Select the Script panel. In the Script panel, select killzone.gd. Replace print(“you died”) with get_tree().reload_current_scene(). Press ctrl + s to save. Test the game. It should reset whenever you die

Scoring
- You should create or locate your points graphic. I am going to use the coins found here. Once you have them, drag them into the assets folder in the FileSystem.
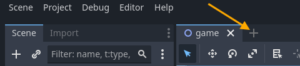
- Press the + to the right of the scene tabs to create a new scene. Press the + in the Scene panel to add a new node. Select Area2D and press Create
- Press the + in the Scene panel to add another node. This time select AnimatedSprie2D. Press Create
- With the AnimatedSprite2D selected, expand the Animation section. Select New SpriteFrames for the Sprite Frames property. Click on SpriteFrames value you just created. The Sprite Frames panel will popup. Press the Add frames from sprite sheet. Navigate to the assests folder and select the image desired. Press Open
- In the Select Frame popup window, adjust the Horizontal and Vertical properties to match the frames of the sprite sheet. Once correct, click (or click and drag) the frames in succession. Press Add [your number selected] Frame(s). Press the Autoplay on load button. Adjust the FPS to desired speed.
- The point needs a collision to be detected. With the root node (Area2D) press the + in the Scene panel. Select CollisionShape2D. Press Create. In the Inspector panel choose New CircleShape2D. Adjust the size and position in the viewport
- Rename the root node, Area2D, to Point by double-clicking on it. In the Inspector, expand Collision. Change the Mask property from 1 to 2. Save the scene by pressing ctrl + s. Navigate to the scenes folder. Press Save
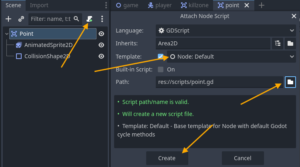
- Nothing is going to happen without a script attached. With the root node selected (Point), press the Attach Script button. Choose Object: Empty for the Template. Press the folder icon and navigate to the scripts folder and press Open. Press Create
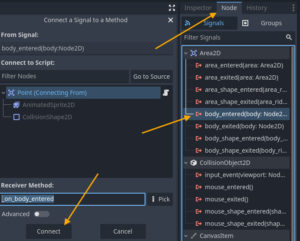
- With the root node selected (Point), Select the Node tab (to the right of the Inspector tab). Double-click on body_entered(body: Node2D). A popup window appears. Select Connect
- Currently the script does nothing. To make sure it works, remove pass and write print(“score =1”). We also want the point to go away. Enter a new line and write queue_free(). Test the game and it should be working