Digital Imaging I
Class 01: Introduction to Digital ImagingTopics
- Class Introduction
- Apple, Windows, & Adobe
- Intro to Photoshop
- Assignment 01
Class Introduction
Hi There!
I'm Jon Cone
I am one of the full-time faculty in Cecil’s Visual Communication Program. I am mostly responsible for the game design and web design programs. I am also a freelance animator typically working on visualizations.
- Office Hours
- Tues 10:00am - 1:50pm
- Wed 1:00pm - 6:20pm
- Honestly just e-mail me. I will make time when it works for you.
- Contact Information: jcone@cecil.edu (prefered)
- (240) 466-1996 (personal)
- 410-287-6060 X 1470
This is an actual picture of me.
Demo Reel (a short collection of work)
- Name:
- What’s your name? What do you go by?
- Why you are here:
- Is this required for your major? Are you taking this course as an elective? Personal Enrichment?
- Experience:
- Do you have any history with graphic arts or arts in general? Any experience with Adobe or other graphics software?
Alright here is an actual picture of me.
Assignments:
Each week a new assignment will be given. All assignments will be submitted before class on Blackboard.
Exam:
There will be a final exam given on the last week of the course. You will be tasked with creating an image based on specific criteria.
Discussion Boards
After each assignment is completed, the image should be posted displaying your work along with a brief description. You will also post an introduction video the first week of the course.
You must also reply to two of your peers posts for full credit. You will have two weeks to post and reply from when the Discussion Board opens.
| Weekly Assignments | 6 | 70% |
| Final Exam | 1 | 20% |
| Discussion Boards | 6 | 10% |
Apple, Windows, & Adobe
Mac:
You will notice that the VCP lab is full of Mac machines. We will be using them in all face to face classes. If you are taking this class online it doesn’t affect you. If you are not familiar with the Apple platform you should not be concerned, it is more similar to Microsoft Windows than you might think.
The largest difference you may notice when switching from a PC to Mac is that many commands replace the ctrl key with the cmd key.
You do not need a Mac for this class. Adobe photoshop is available for both PC and Macintosh systems.
For more information about the iMac you may visit the iMac support page.

Windows:
My home computer is a Windows machine. Therefore all tutorials will be utilizing that operating system. You can however use a Mac just as well for this course.
Introduction to Photoshop
Photoshop
Digital Imaging I will focus entirely on using Adobe Photoshop to manipulate and create imagery. This program has become the standard in many industries including photography and graphic design.
The Interface
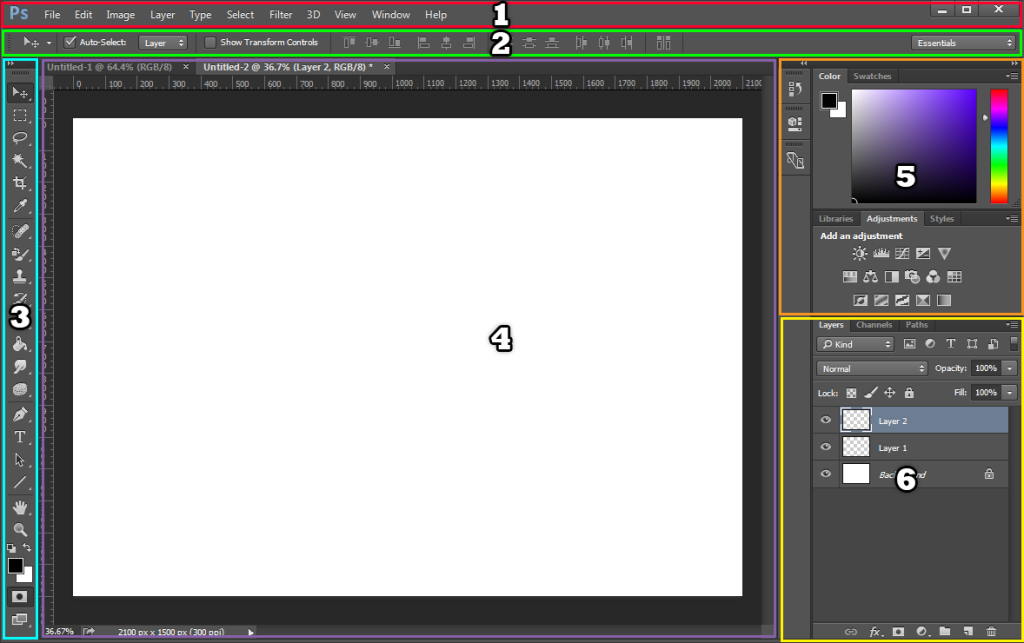
click on accordion below to learn about the different panels in Adobe Photoshop.
1: The Main Menu
Basic file management such as open, close, save,etc. Change preferences, settings, display etc. Drop-downs for whole image adjustments, etc.
2: The Toolbar
Settings specific to the current tool selected.
3: The Toolbox
Contains major tools used most to affect specific areas of an image or to generate imagery itself.
4: The Work Area
Area where your workable images is located.
5: The Panels
Customizable panes that store tools, functions, and general information.
6: The Layers Panel
A significant panel that allows you to navigate through the layered “sheets” of your image.
Introduction to Photoshop’s Interface Video
These videos quickly explain the areas of Photoshop. You may download the image used in this tutorial here: digitImaginWeek01LabMaterials.
Assignment 01
Basic Image Editing:
Your first assignment is to produce three versions of a recent image of yourself or someone you know. There should be an original unedited, enhanced, and creative image. The purpose of this assignment is merely to help get you acquainted with Photoshop. Exploration and variation is highly encouraged.
-
- Unedited:
- Simply save a version of your image that has not be changed in any way.
-
- Basic Adjustments:
- Use adjustments to fix the overall quality of the image, enhancing its color, value, contrast, etc.
-
- Creative:
- Utilize a variety of filters and tools to produce a creative image. Really just try to experiment to see what you can create.
You will submit this digitally on Blackboard. All assignments will also include the project cover sheet. You can grab it here. Just answer the questions in the document.
Be sure to post your images on the Discussion Board for critique.
You will be graded on the following:
- Project Cover Sheet
-
Thoroughly completed and thoughtfully written with little or no grammatical errors.
-
- Basic Requirements
-
Three 6 x 9, 300 ppi, PSD images (unedited, enhanced, creative) placed in a folder and zipped (winzip).
-
-
Enhanced Image
-
Effective and appropriate use of adjustments that truly enhance the image.
-
-
Creative Image
-
Innovative use of tools. Very unique and interesting image. Something very different from others. Novel and innovative.
-
Resources:
- Project Cover Sheet
- You may download the project cover sheet here.
- Assignment Video Tutorials
- You may watch the tutorial videos below to help you complete your assignment.
- Ghost-It
- This application allows you to apply transparency to a window. This mean you can make a tutorial video see-through behind the document you are working on. It could be helpful while completing tutorials. You may download it here.
Assignment Video Tutorials
This tutorial covers making basic image adjustments, creative exploration to enhance a portrait photo. You may download the image used in this tutorial here: digitImaginWeek01LabMaterials.
Wait! Before you go!
Did you remember to?
- Familiarize yourself with Blackboard
- Read through this webpage
- Submit Week 01Basic Image Editing Assignment on Blackboard
- original image, enhanced image, creative image, and project cover sheet
